Team, folder, and file organization

A good structure makes it easy to answer a few basic questions:
- Where does this work belong?
- Who owns it?
- Which version is current?
- How do I find that thing from two years ago that nobody remembers making?
Clear structures make it easier for your team and cross-functional partners to find and understand the work. That structure starts at the organization level and continues all the way down to the pages, sections, and layers inside a file.
There is no single correct way to organize everything. Different structures work for different companies, products, and teams. Don’t let anyone tell you otherwise.
The approaches in this guide are patterns we’ve seen work well through the years. Treat them as starting points, then adapt them to how your organization operates.
Most importantly, choose a structure your team can maintain consistently. A simple system that everyone understands is more useful than an elaborate hierarchy that quickly becomes outdated. Start small and remember you can always add, move, nest, or recolor folders as your work evolves.
Most examples in this guide focus on design work, but the same principles apply to FigJam boards, slides, sites, and other files your team creates in Figma.
This guide covers:
- How the levels fit together
- How to structure teams
- Tips for organizing folders
- Best practices for managing files
- Best practices for organizing work inside files
How the levels fit together
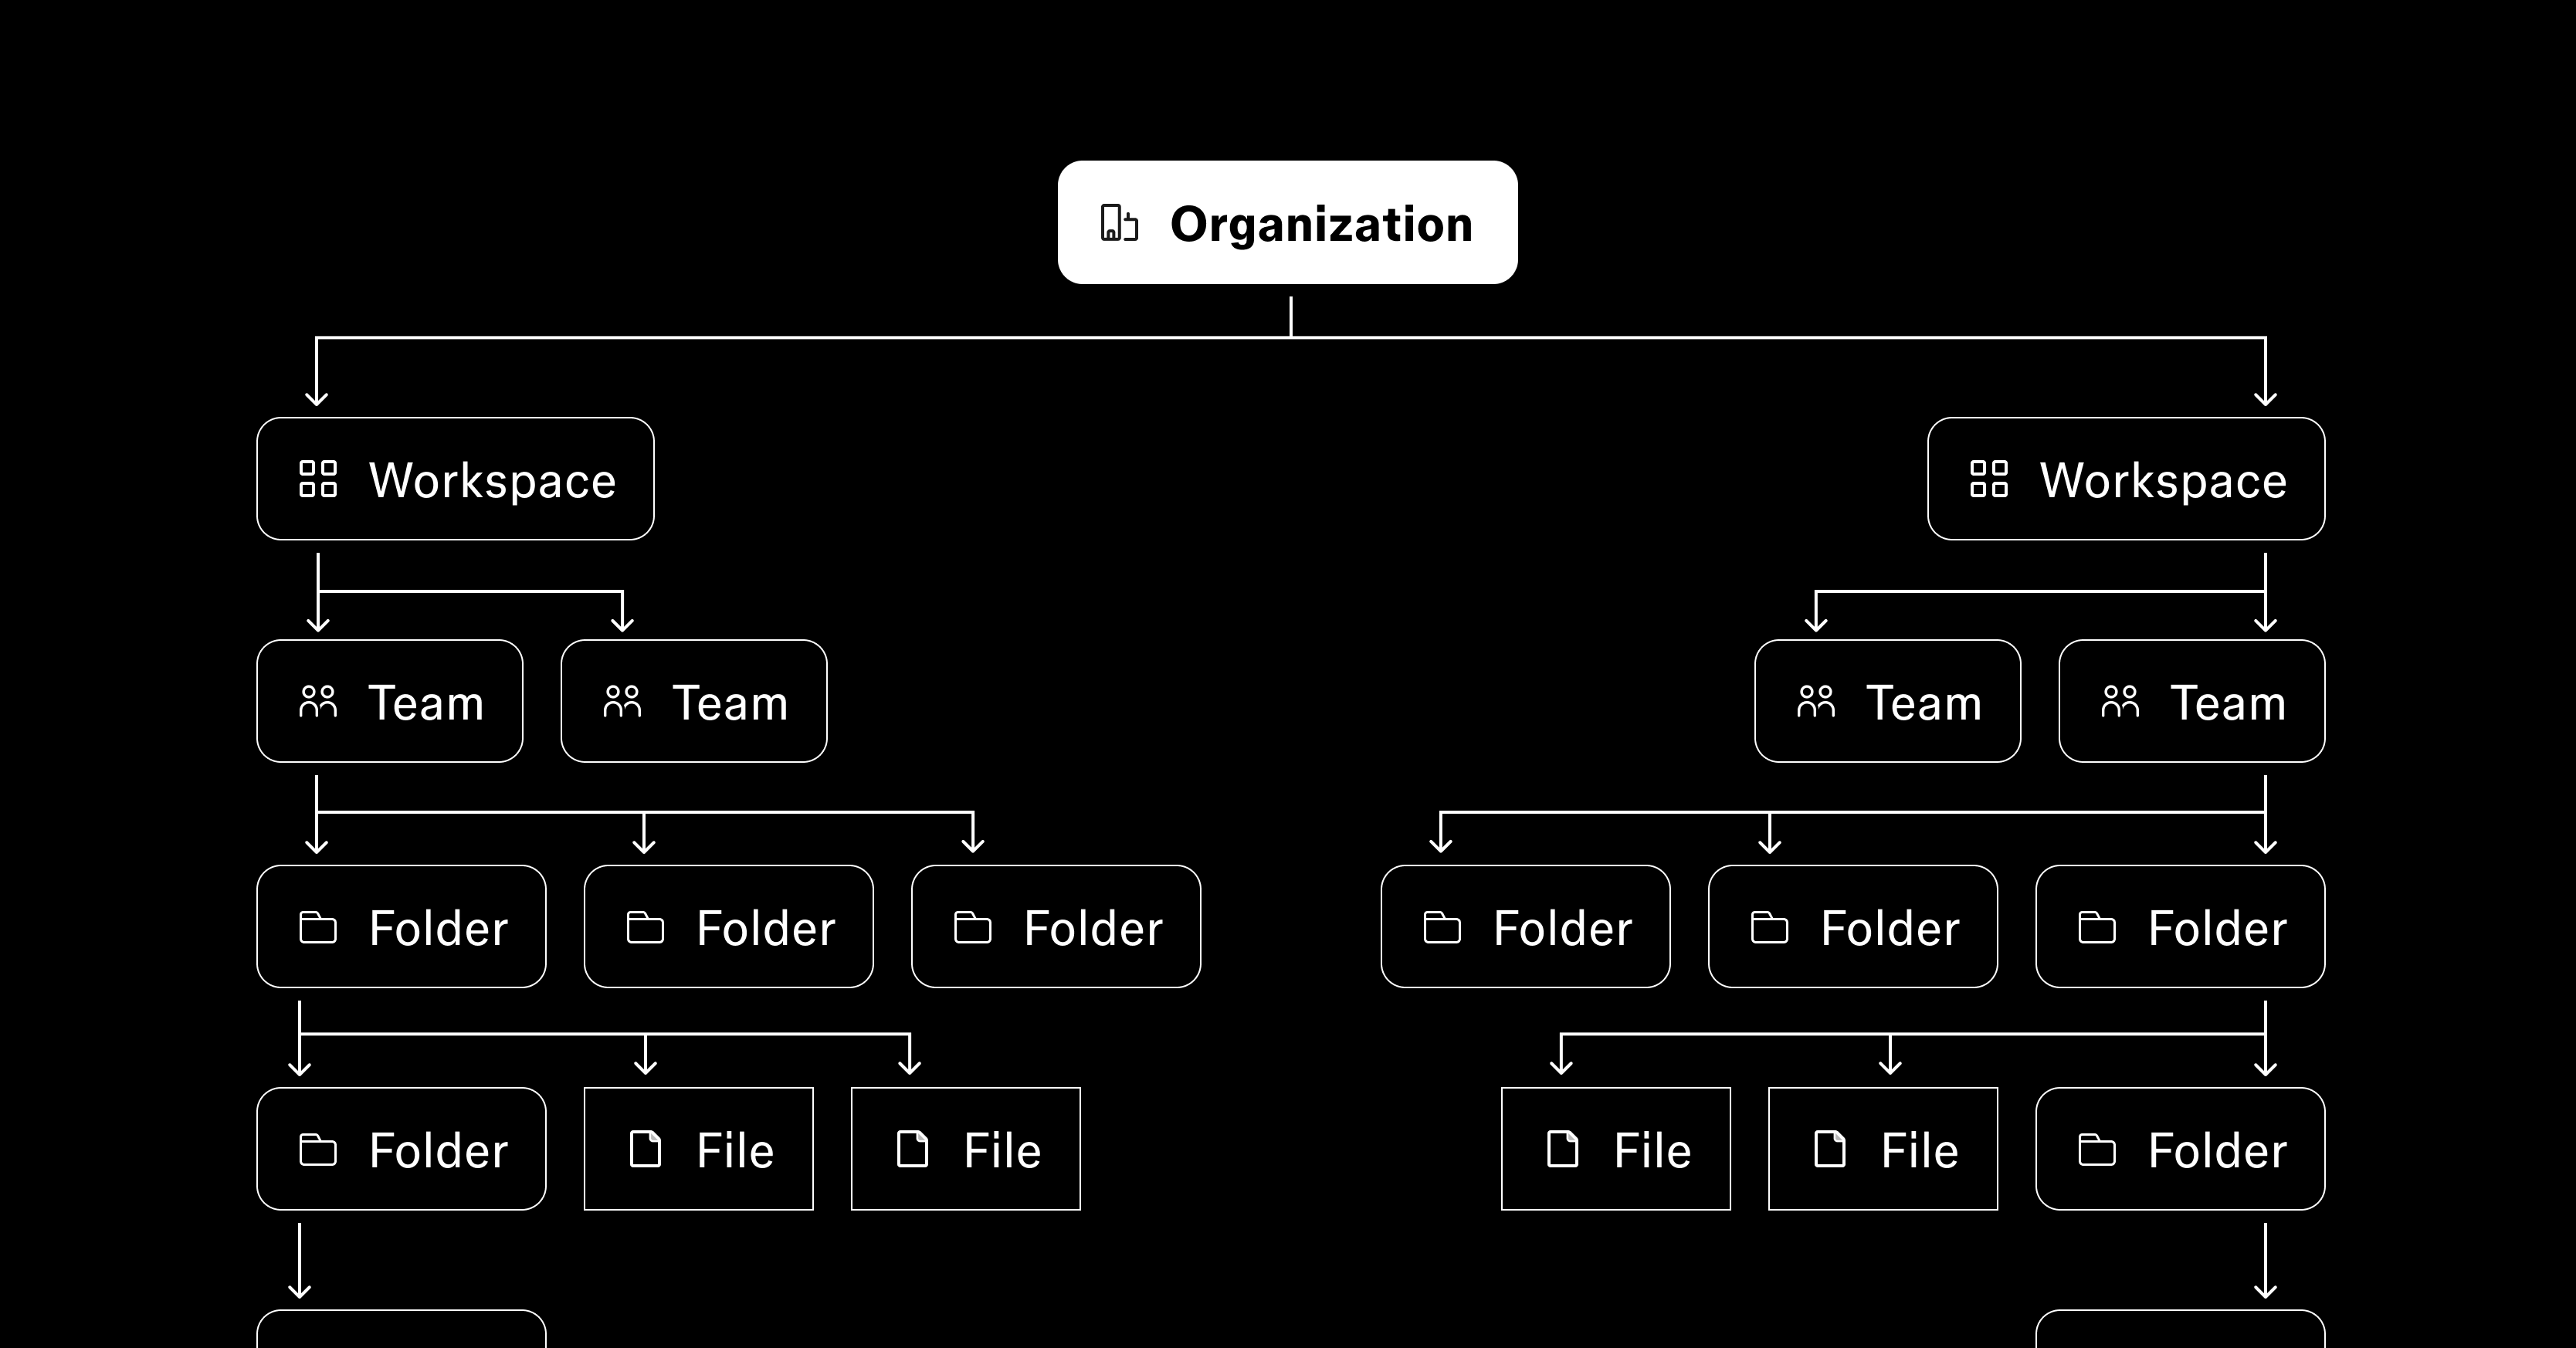
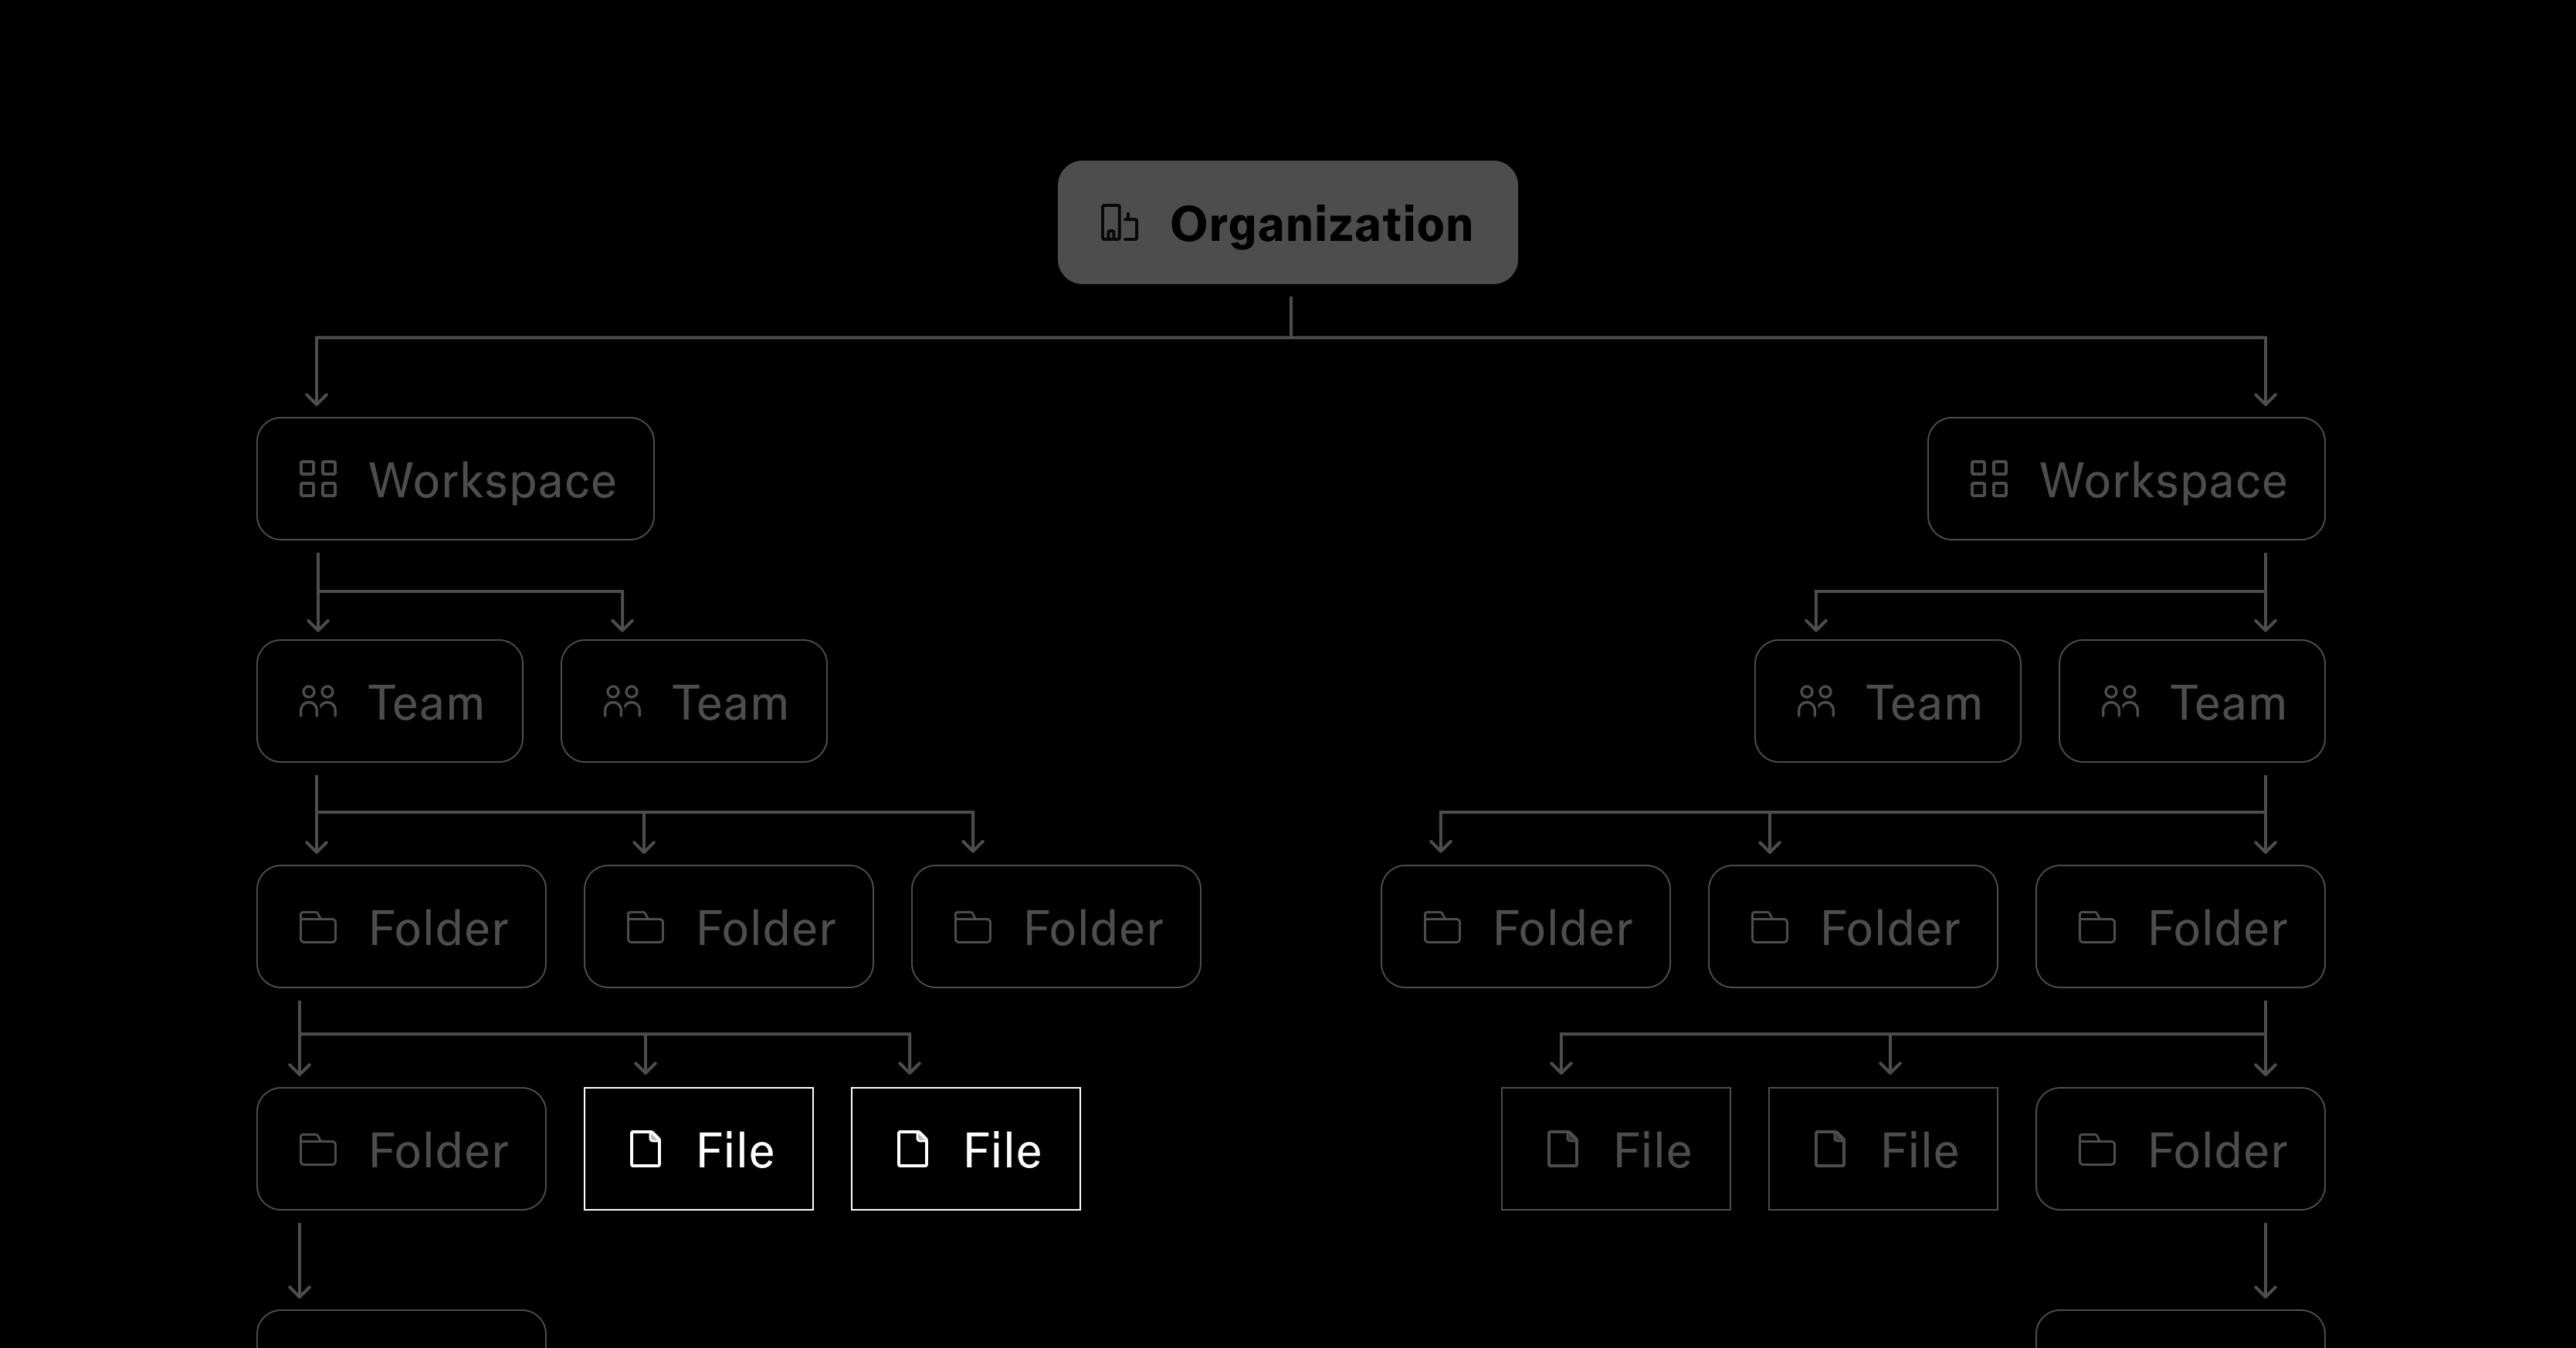
Figma uses several levels to organize people, access, and work. Each one serves a different purpose:
- Organizations provide a shared home for a company’s people, teams, settings, and resources.
- Workspaces can group related teams across a large organization, such as by business line, platform, region, brand, or department.
- Teams bring together people, permissions, and the resources they share.
- Folders organize the work inside a team. Nested folders can go up to 10 levels deep.
- Files are where the work happens.
You may not need to make decisions at every level. The important question is what belongs together within the structure available to you.
As a starting point:
- Use a workspace to group several related teams.
- Create a team when the people working together or their access needs change.
- Create a folder when the way the work is organized changes.
- Create files as you need them—for designs, workshops, explorations, presentations, or anything else your team makes in Figma.
These are not fixed rules. A team called Checkout can make perfect sense when Checkout is both a stable product area and the group responsible for it.
How to structure teams

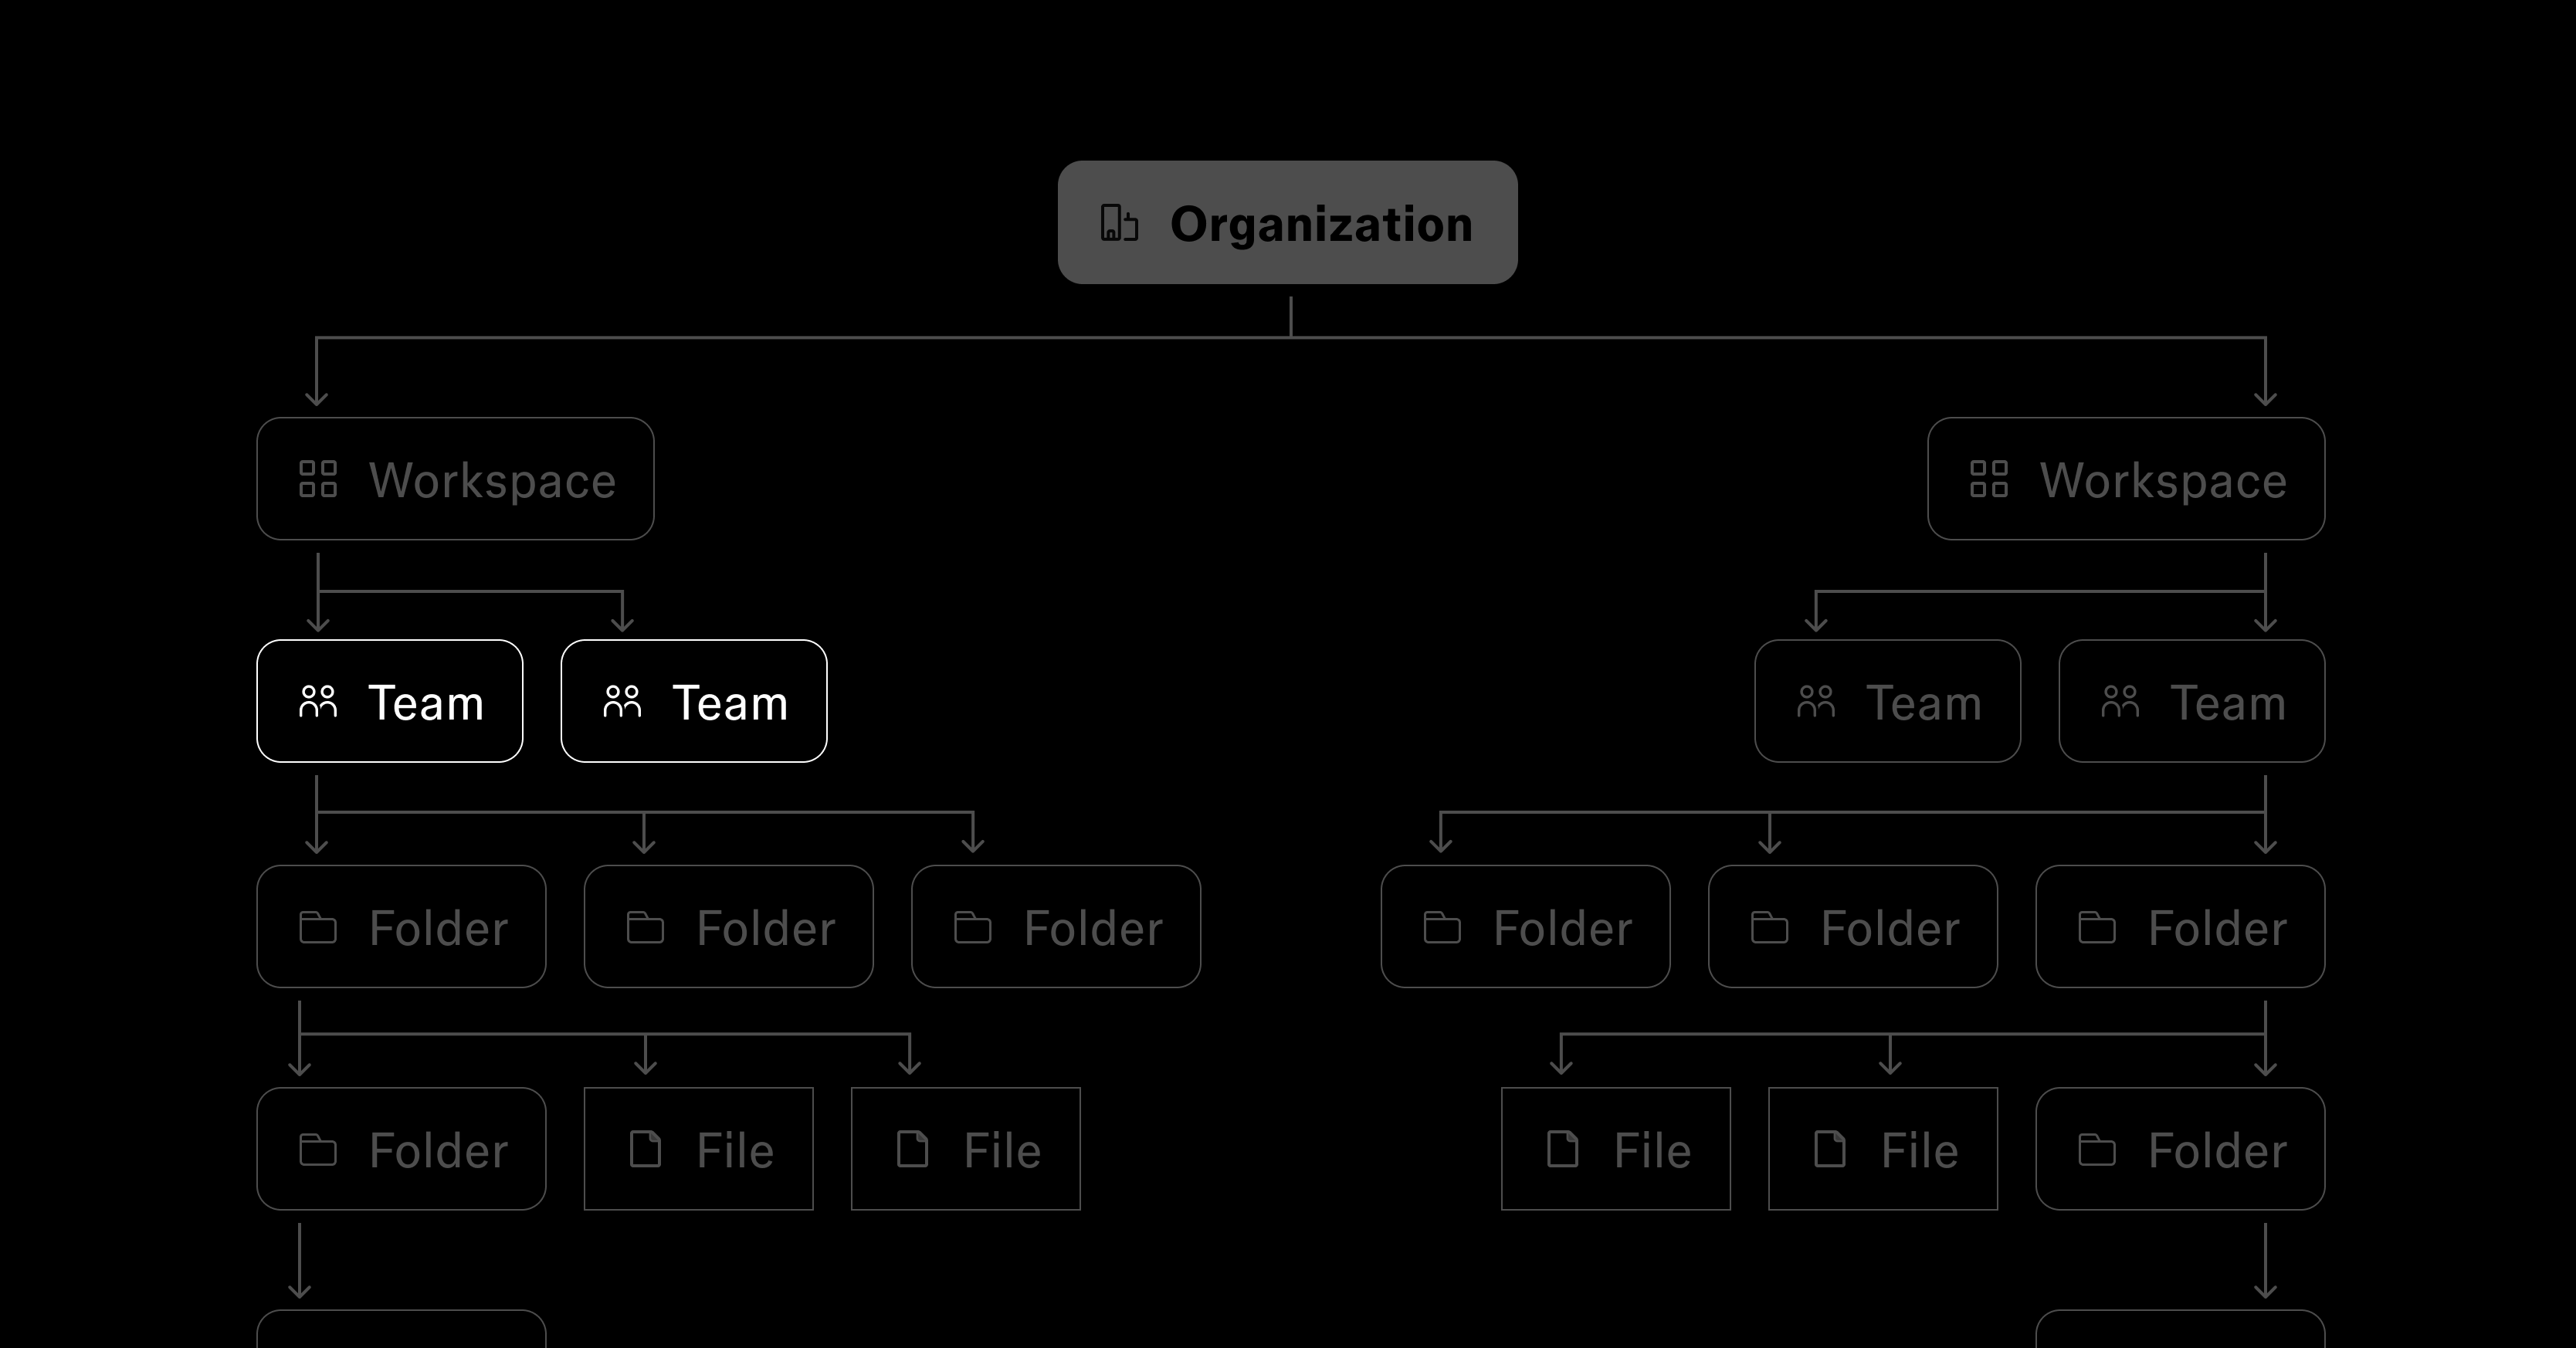
Teams can mirror how your company is structured and help you control who has access to the work inside them. A team can be limited to invited people or made available more broadly across a workspace or organization, with view or edit access. See team permissions for the full model.
When deciding whether to create a team, ask whether the people, ownership, or audience are meaningfully different. If they aren’t, keep the work together and use folders to organize it.
When a group of people isn’t a team
Not every group of people needs another place for work to live. User groups let you name a set of people once, then share work with them or mention them together.
Use a user group when people belong together for access or communication, but their work already lives across existing teams. Use a team when that group also needs a shared home for the work it owns.
Give your design system its own team
Many organizations benefit from giving their design system, or set of Figma libraries, its own team. This creates a clear home for the people who maintain it and the shared foundations other teams rely on.
Different teams can still use different design systems. The goal isn’t necessarily one universal library, but a reliable home for each shared system.
When to use a workspace instead of a team
In larger organizations, a line of business, platform, region, brand, or department may contain several related teams. That broader grouping may belong in a workspace.

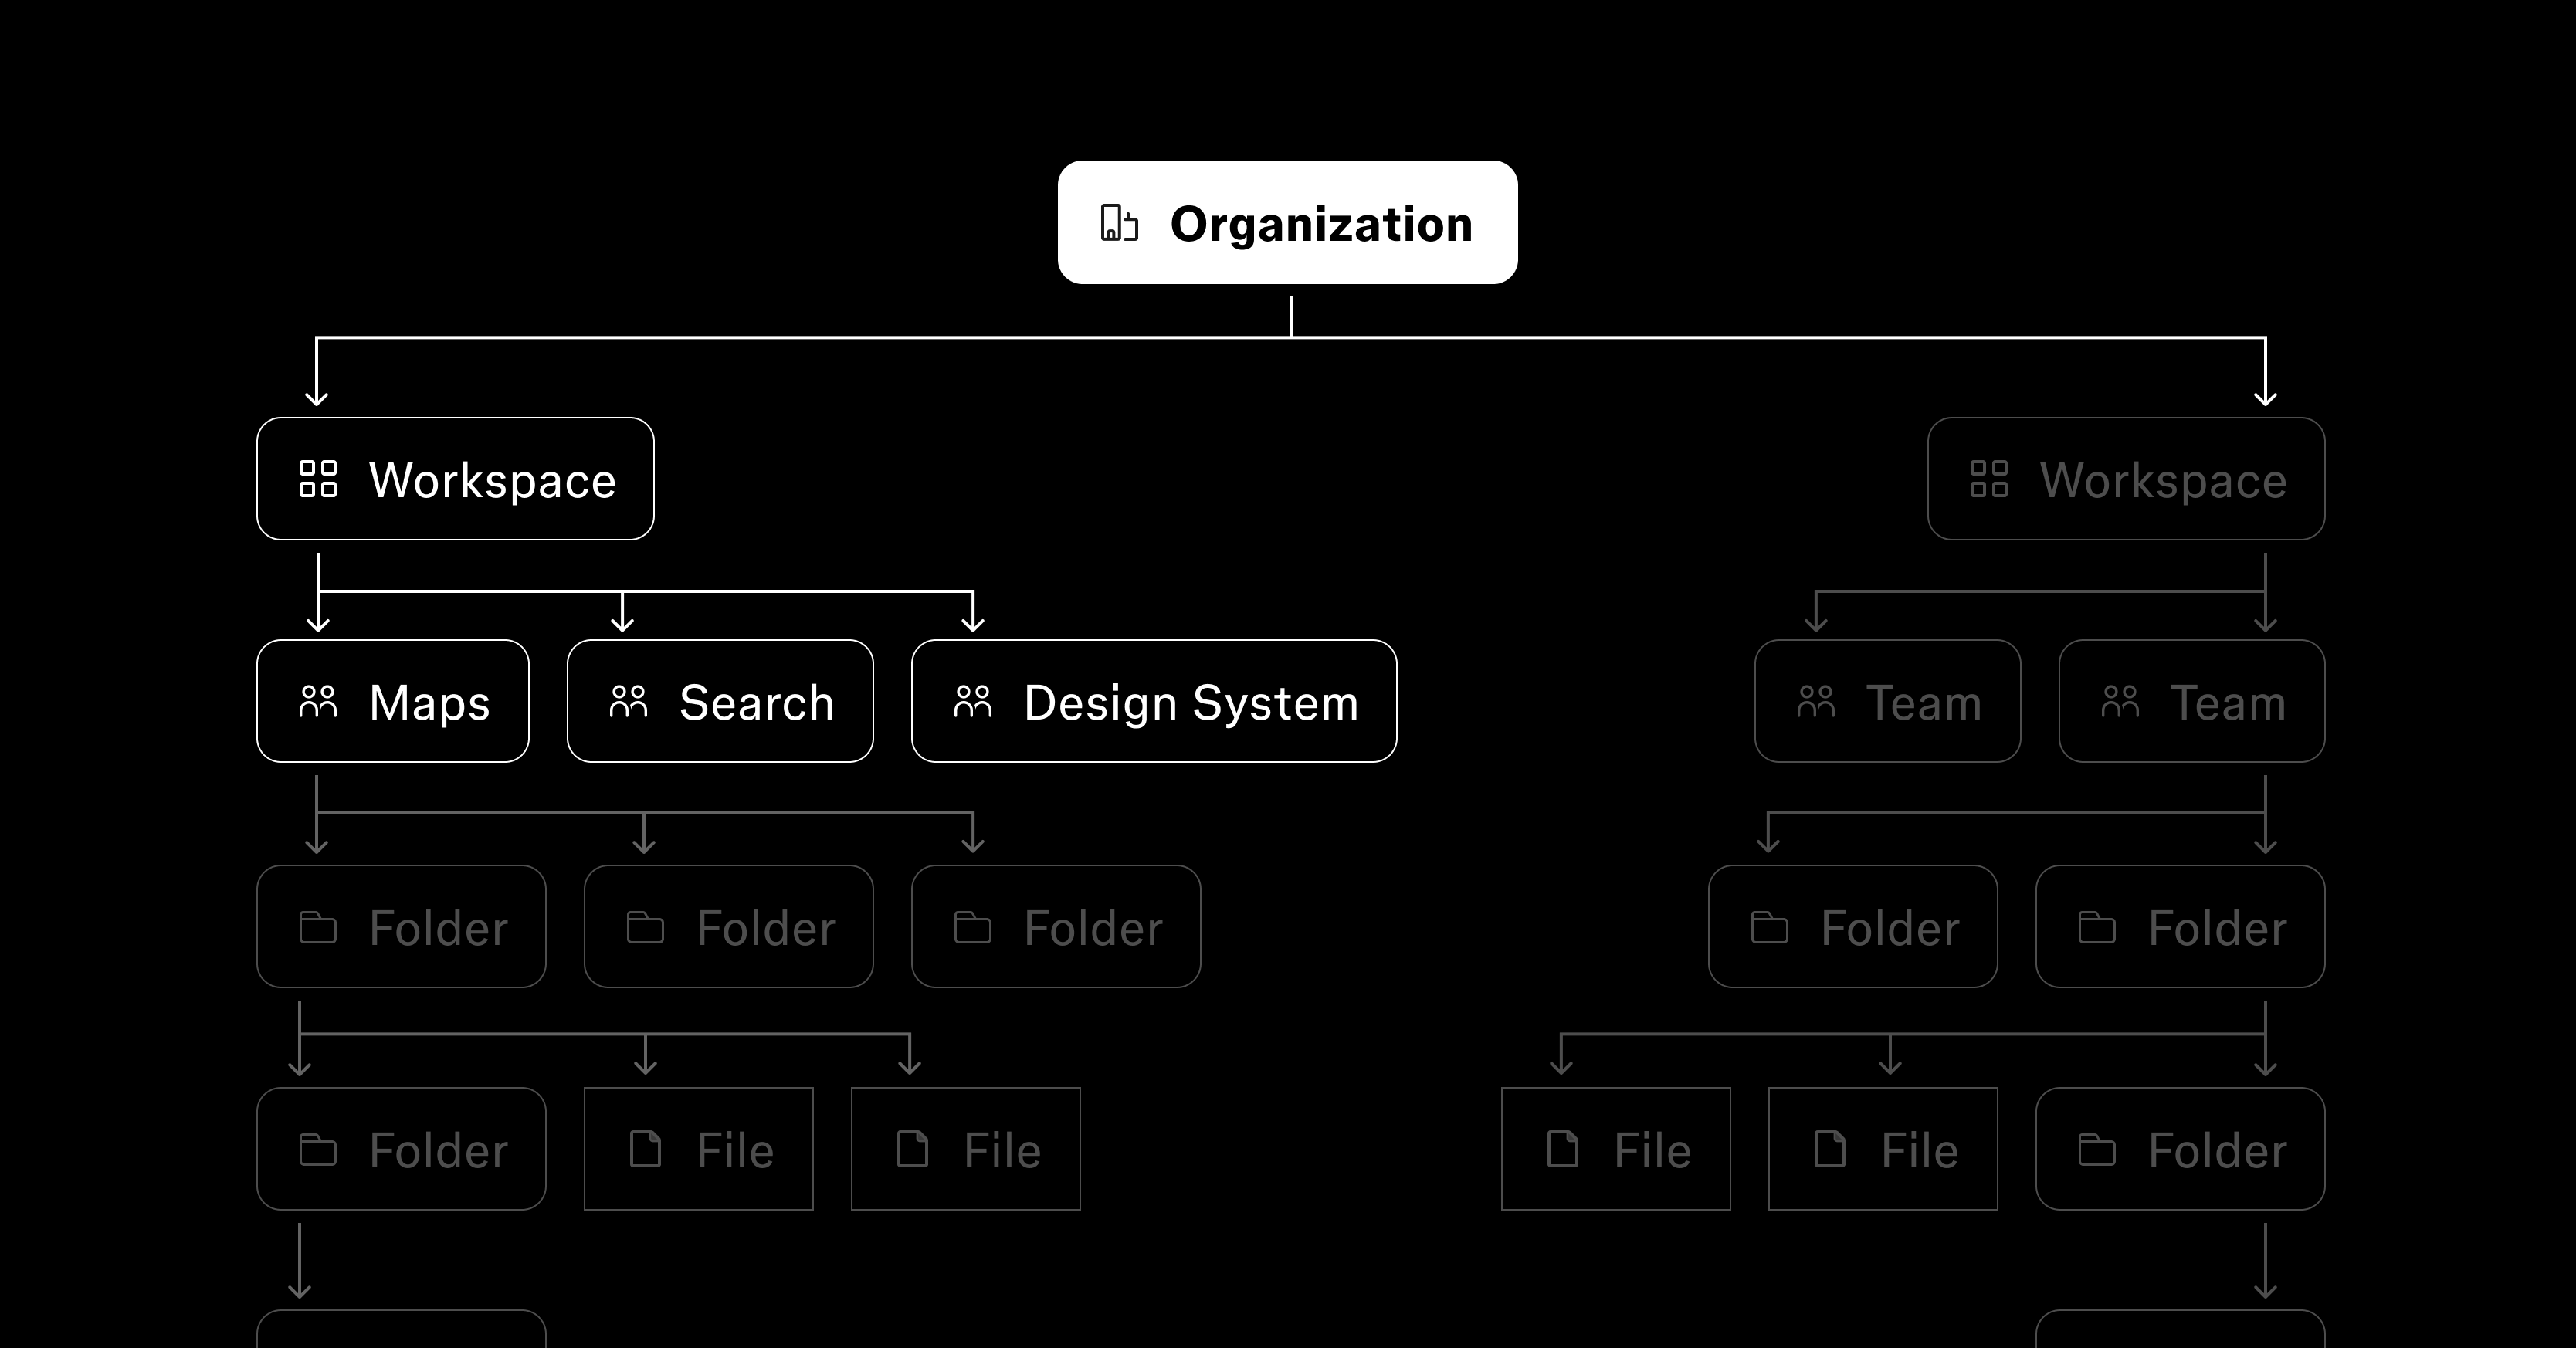
A company might have a workspace for its consumer products, containing teams for Maps, Search, and the design system that both rely on.

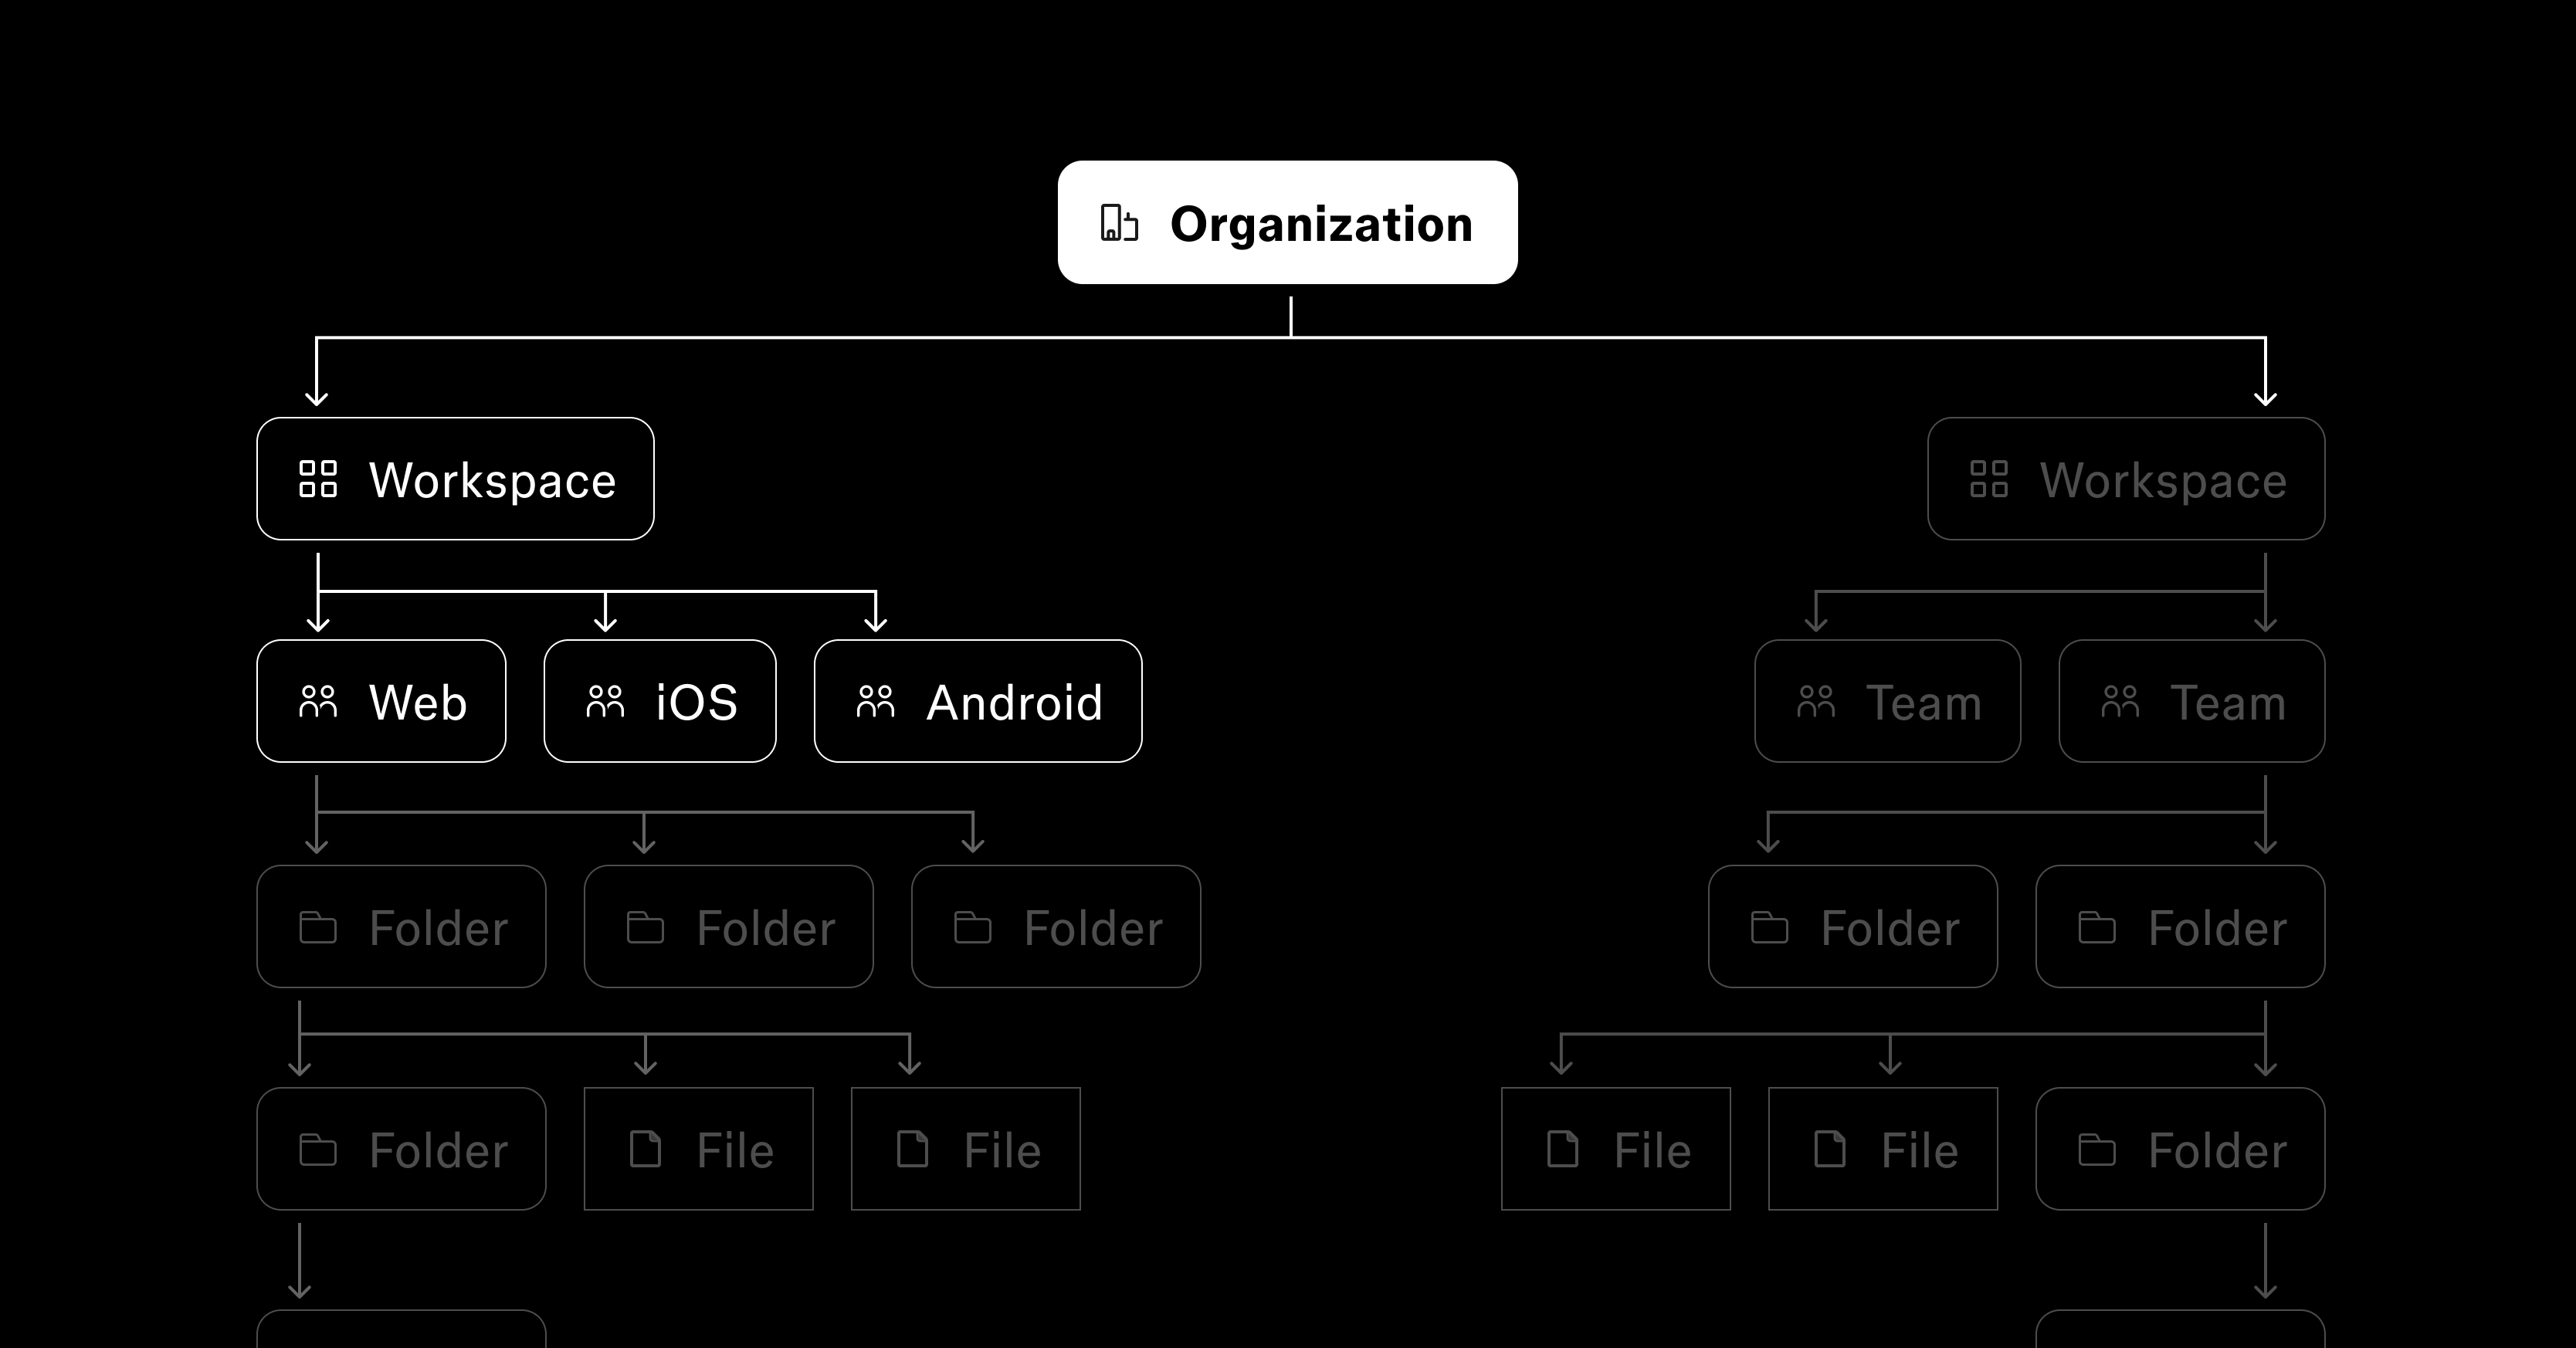
Another might group by platform, with a workspace holding Web, iOS, and Android teams for the groups building on each.
In a smaller organization, you may not need workspaces at all. Maps or iOS might simply be a team. The right level depends on how many related groups sit underneath it.
Initiatives and pillars
Some organizations form teams around long-running initiatives, major releases, client engagements, or product pillars. That works when the group of people working on that initiative or product is stable and has its own ownership or access needs.

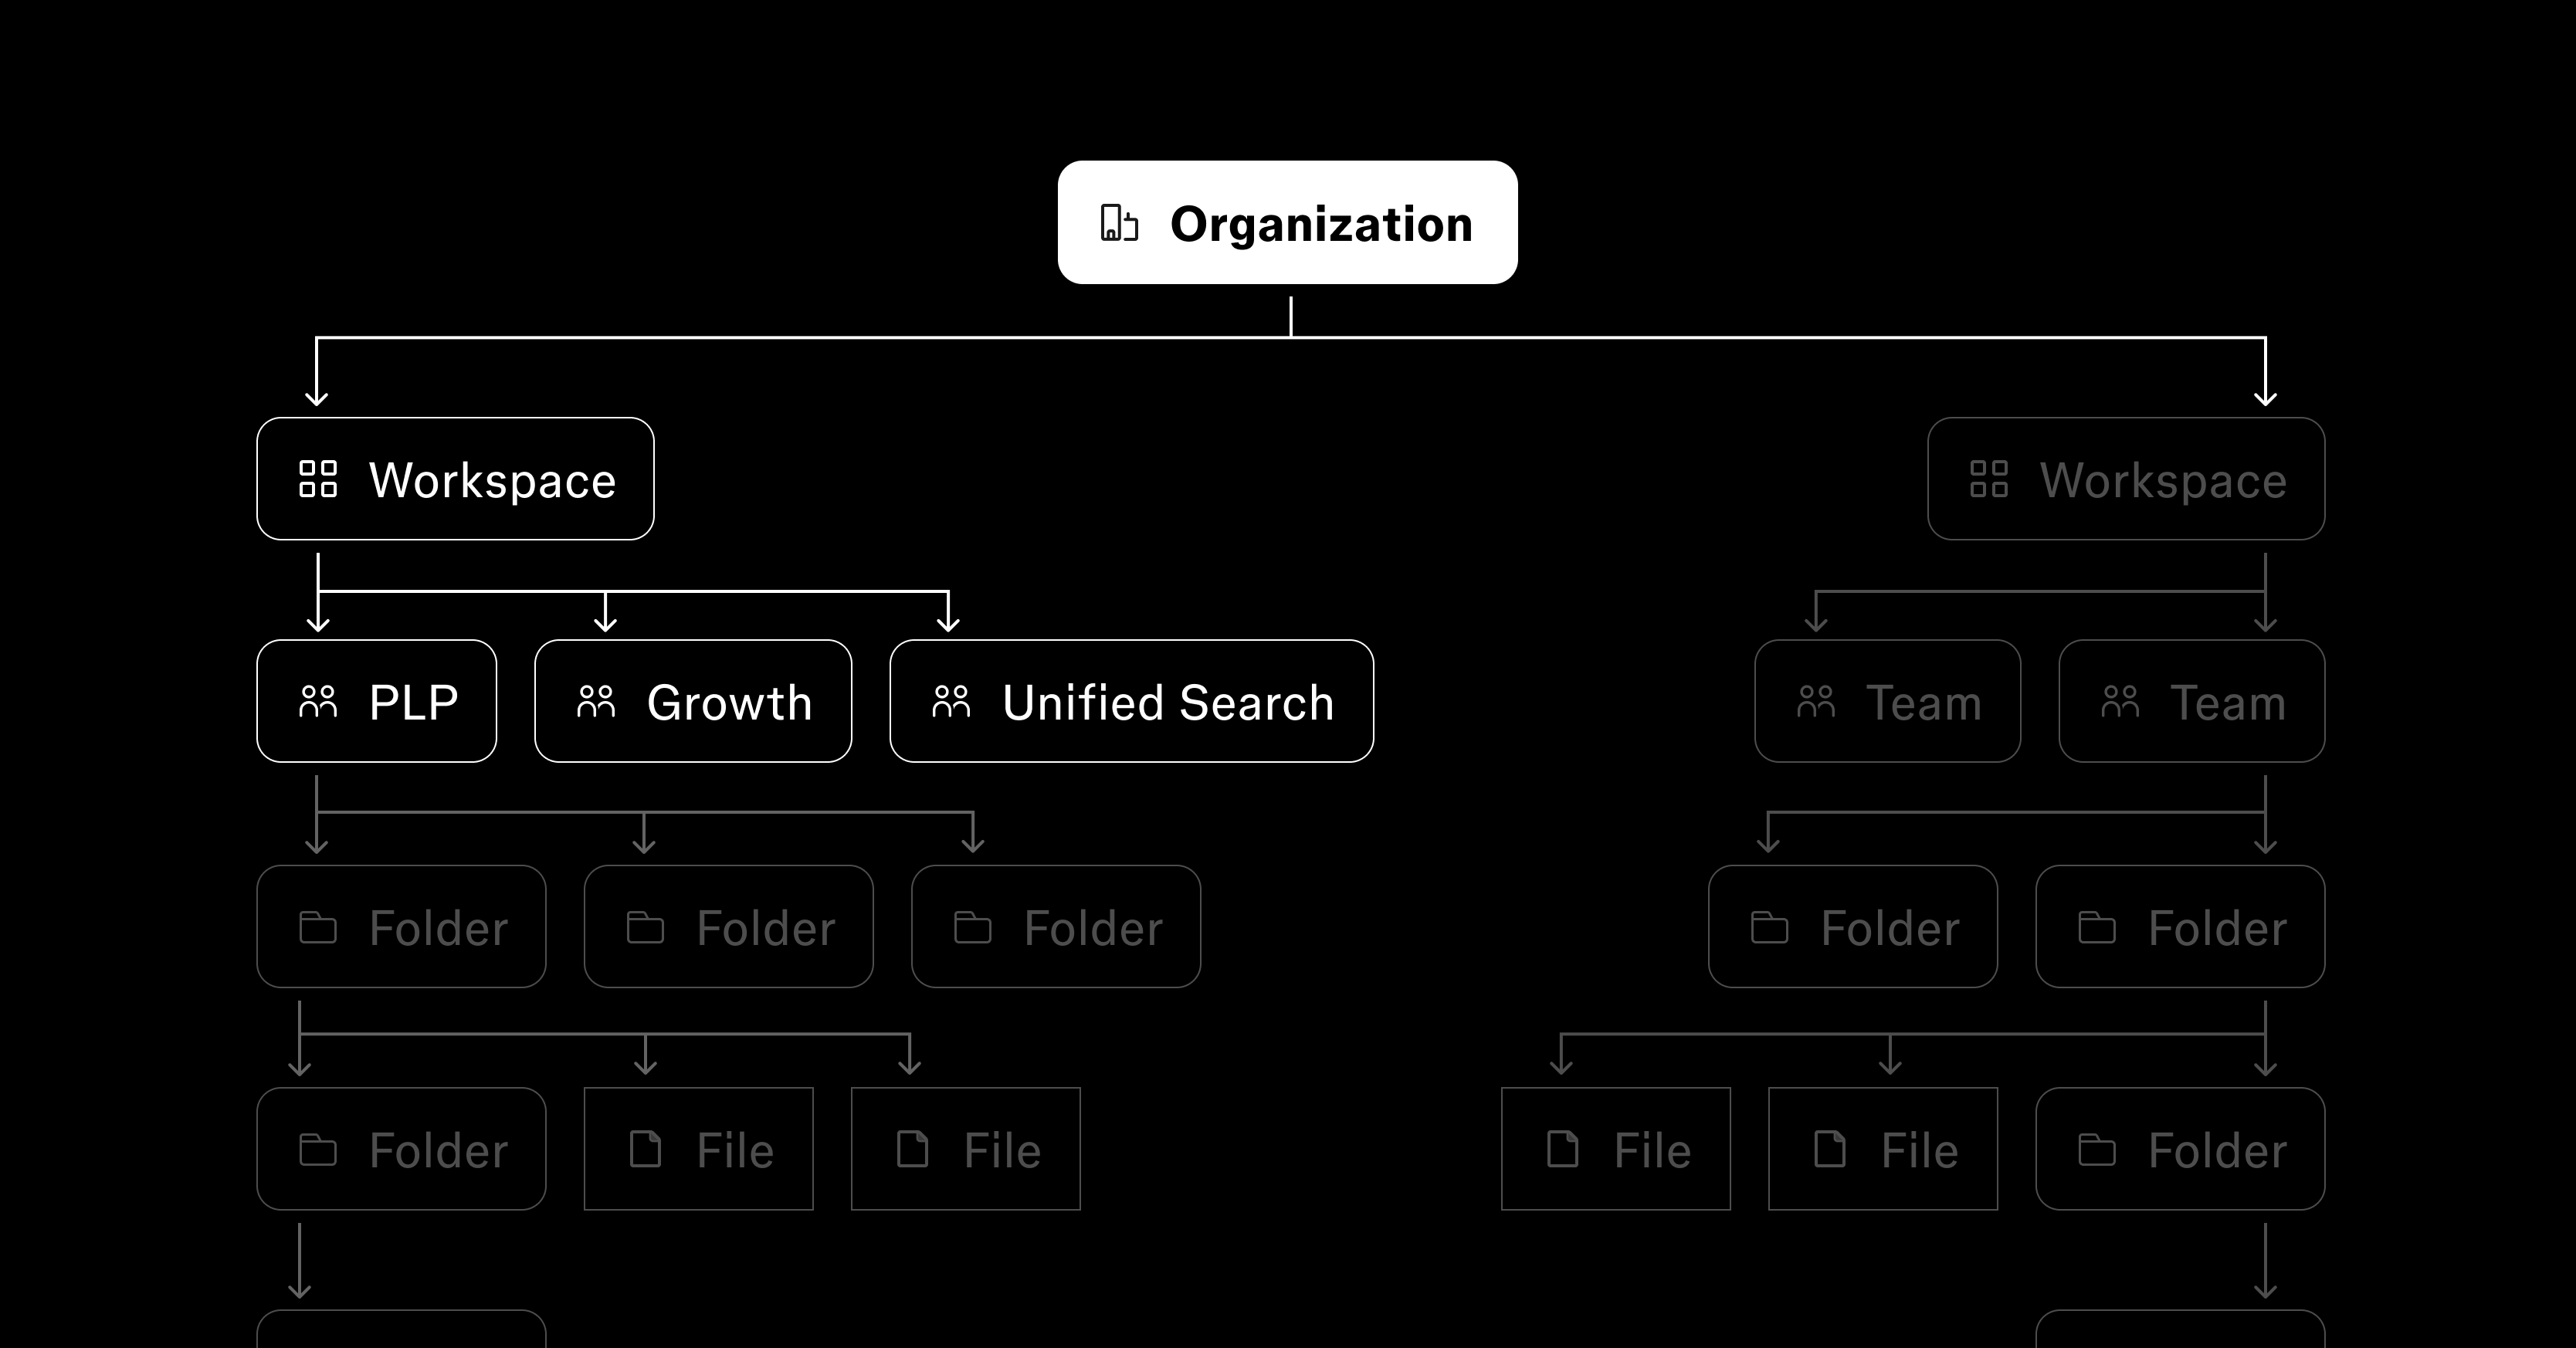
Pillars are how we structure teams at Figma: one durable cross-functional group owns branching, another owns prototyping, and each has its own space.
But many initiatives are simply bodies of work owned by an existing team. Those belong in folders.
Ask what will still exist a year from now. If the people and ownership are durable while the projects will change, create a team for the people and folders for the work. Cross-functional product teams are a good example: the squad remains while its features come and go.
Keep teams focused
There is no perfect team size, but ownership becomes harder to understand as the number of editors grows. The two-pizza rule remains a useful test: if two pizzas would not feed the editors, check whether the team is trying to hold too many different conversations at once.
Be deliberate about who needs to edit, and generous with visibility. Designers, developers, researchers, product managers, and other partners often need the context without needing to change the work.
Tips for organizing folders

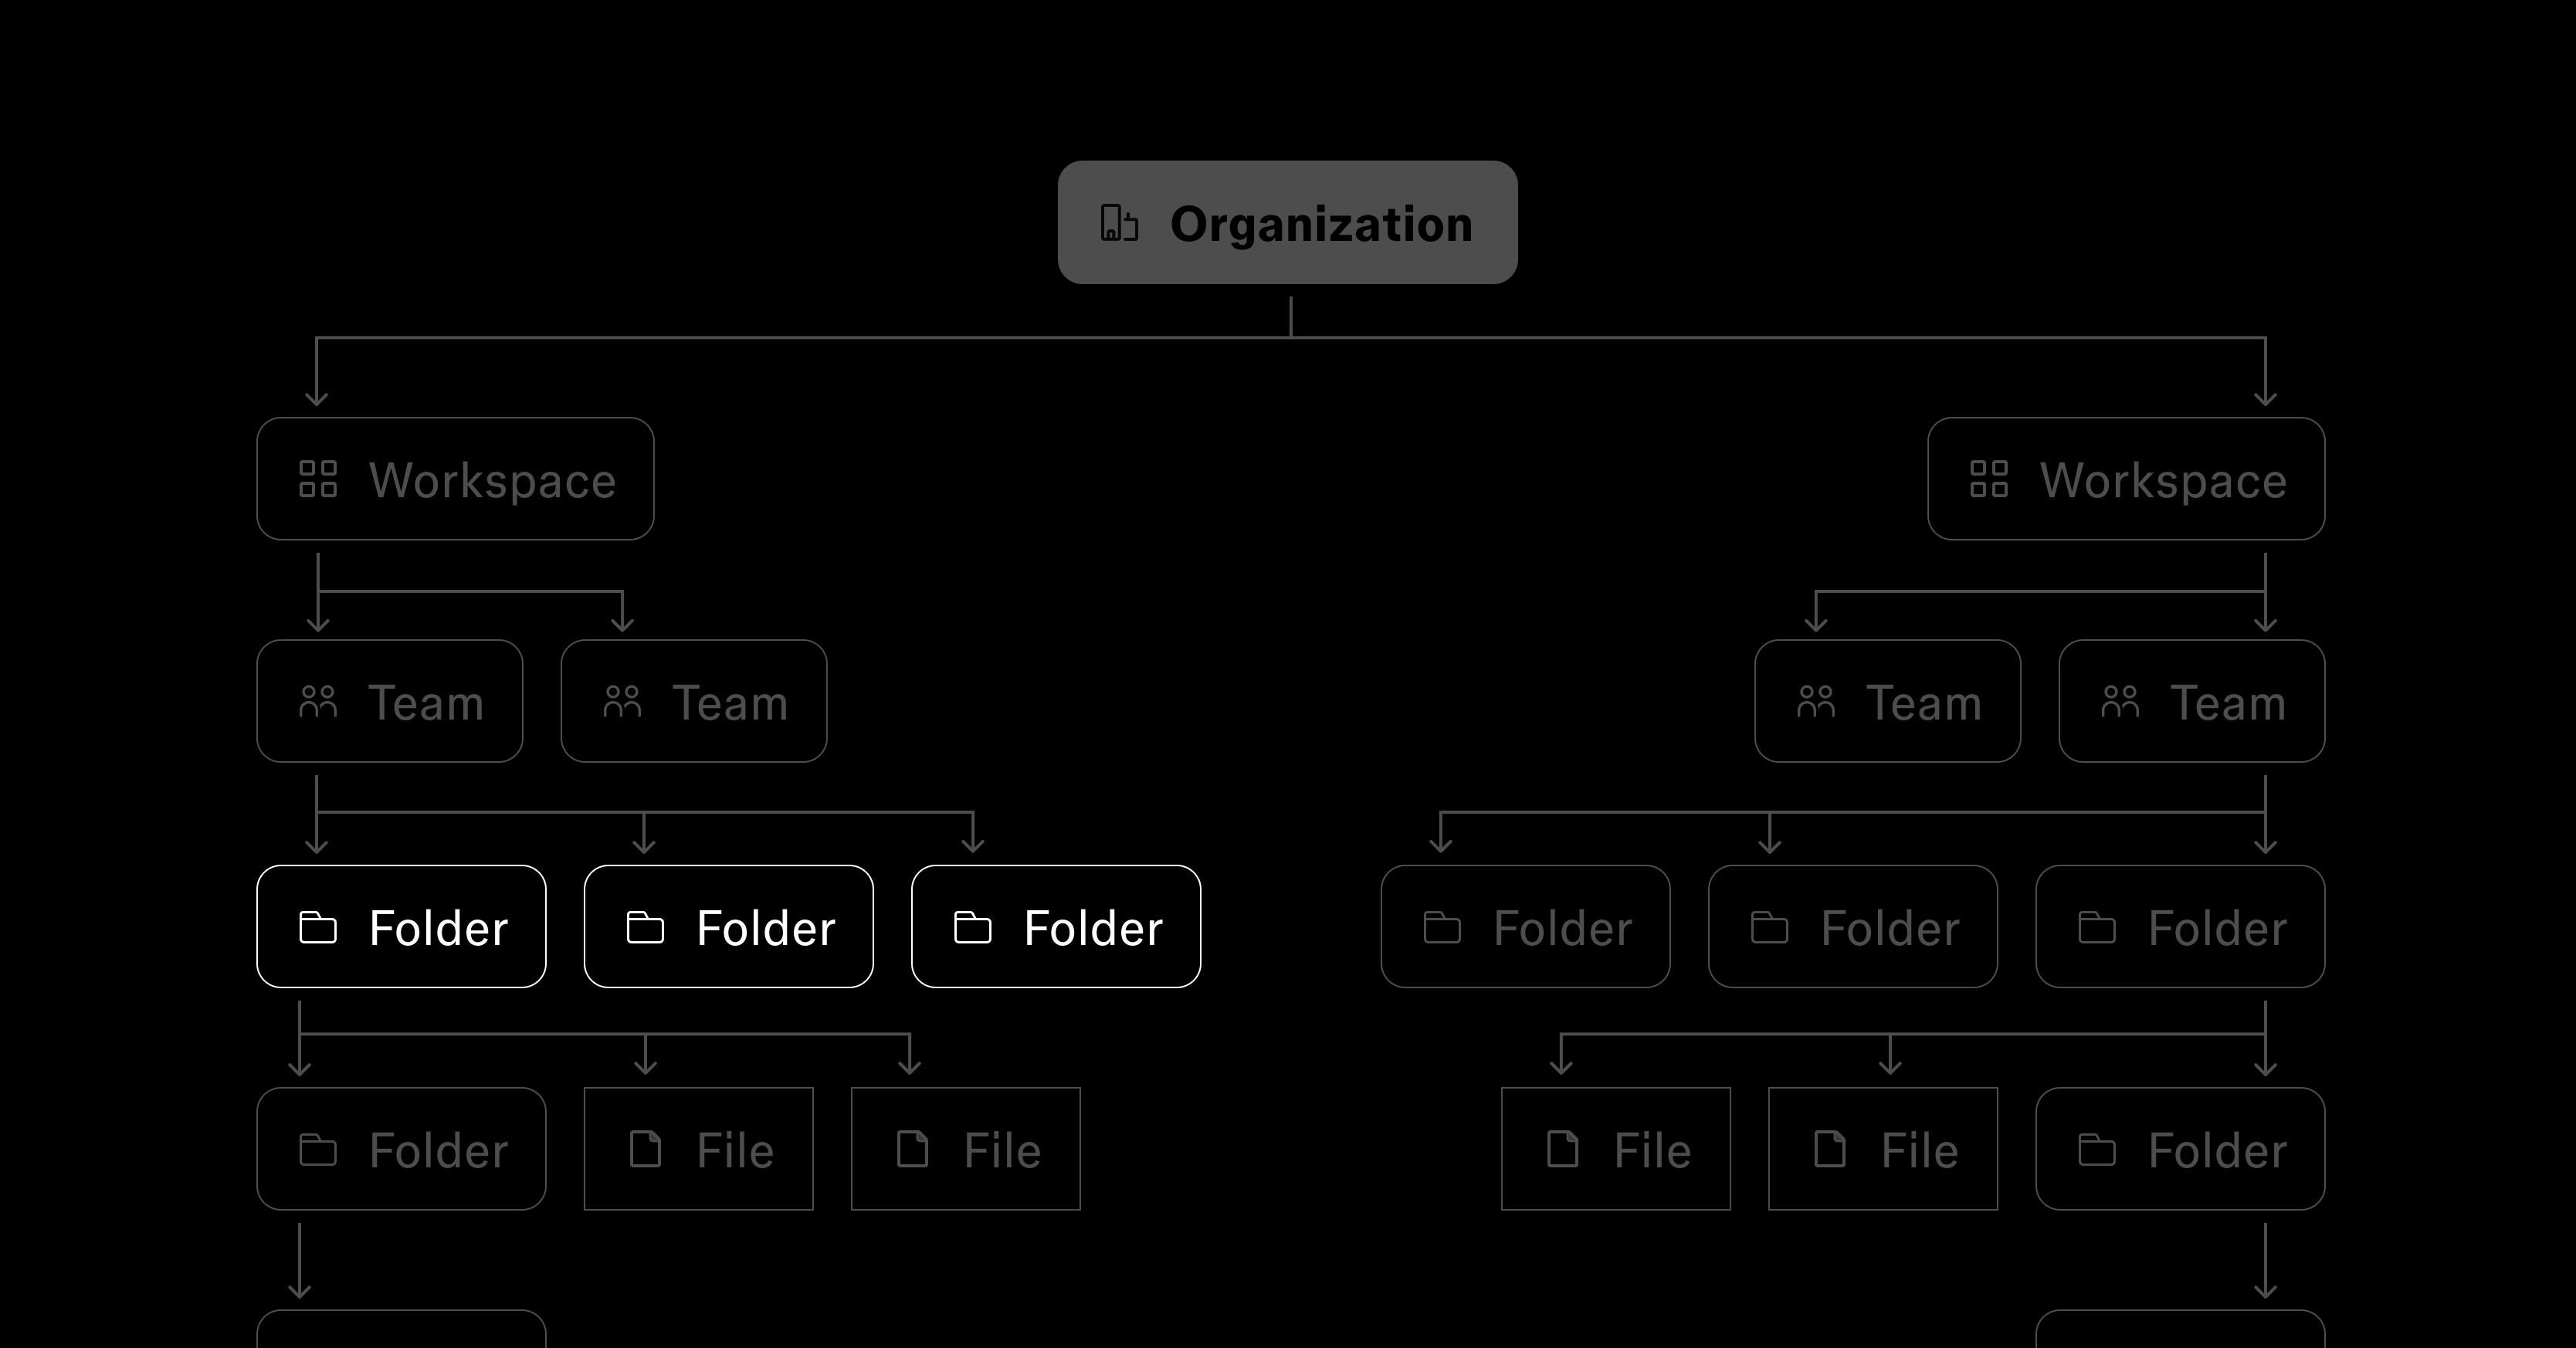
Folders live within teams and hold files and more folders, nested up to 10 levels deep. Clear names and short descriptions help people know what belongs where, while color makes a long list easier to scan.
Moving from projects to folders? Your projects became folders automatically, with the same people keeping the same access. If your team also built hierarchy into names, you don’t need to reorganize everything at once. Start with one repeated prefix, like “Production -” or “iOS -”, and turn it into a parent folder. Move the related work inside, drop the prefix where it’s no longer useful, and repeat as your team naturally revisits each area.
How folder sharing works
Sharing follows the structure. A subfolder inherits access from the folder above it, so setting access at the top of a hierarchy cascades down through everything inside. When you need something tighter, you can limit any folder to specific people, and any folder can be made private.

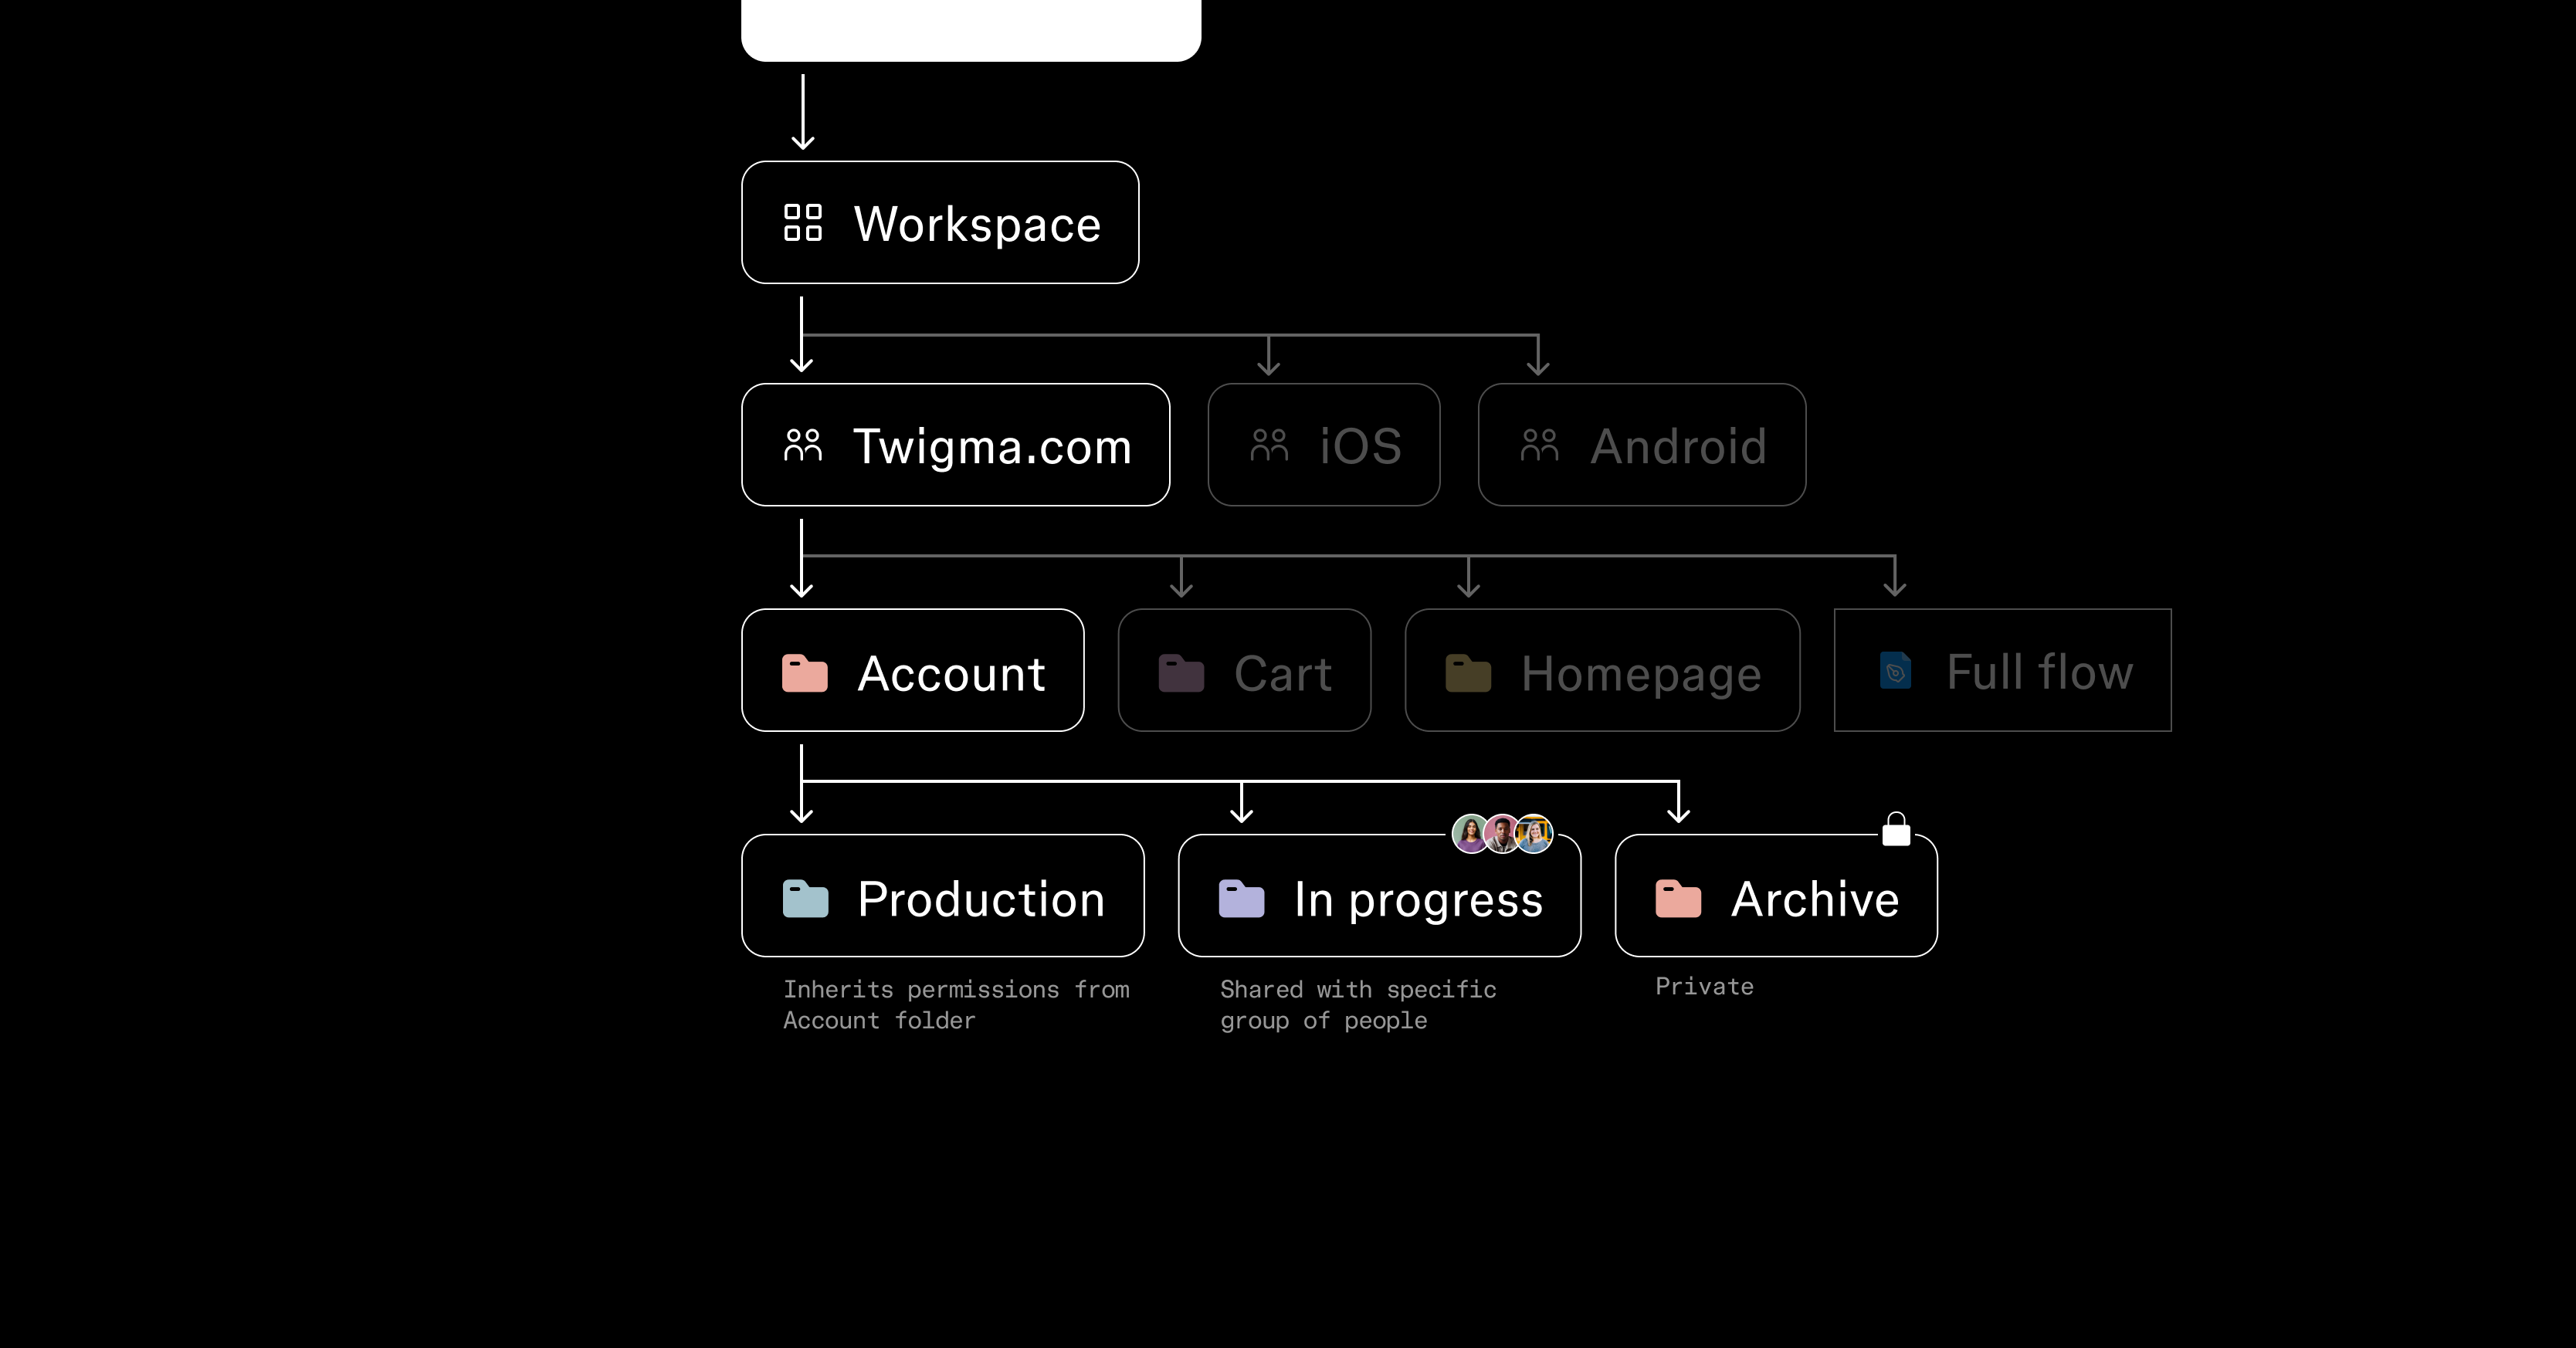
This makes access one more thing your structure communicates. If everyone with access to Account should see everything inside it, nest freely. If part of the work needs a smaller audience, either limit that subfolder to specific people or place it higher in the hierarchy with its own access.
Choose your starting point
There are three patterns we’ve seen work well, and with nesting you’ll likely combine them:
- By product surface: Account, Cart, Homepage, Listings
- By work status: what’s live versus what’s in progress
- By stage of the design process: WIP, Review, Development, Shipped

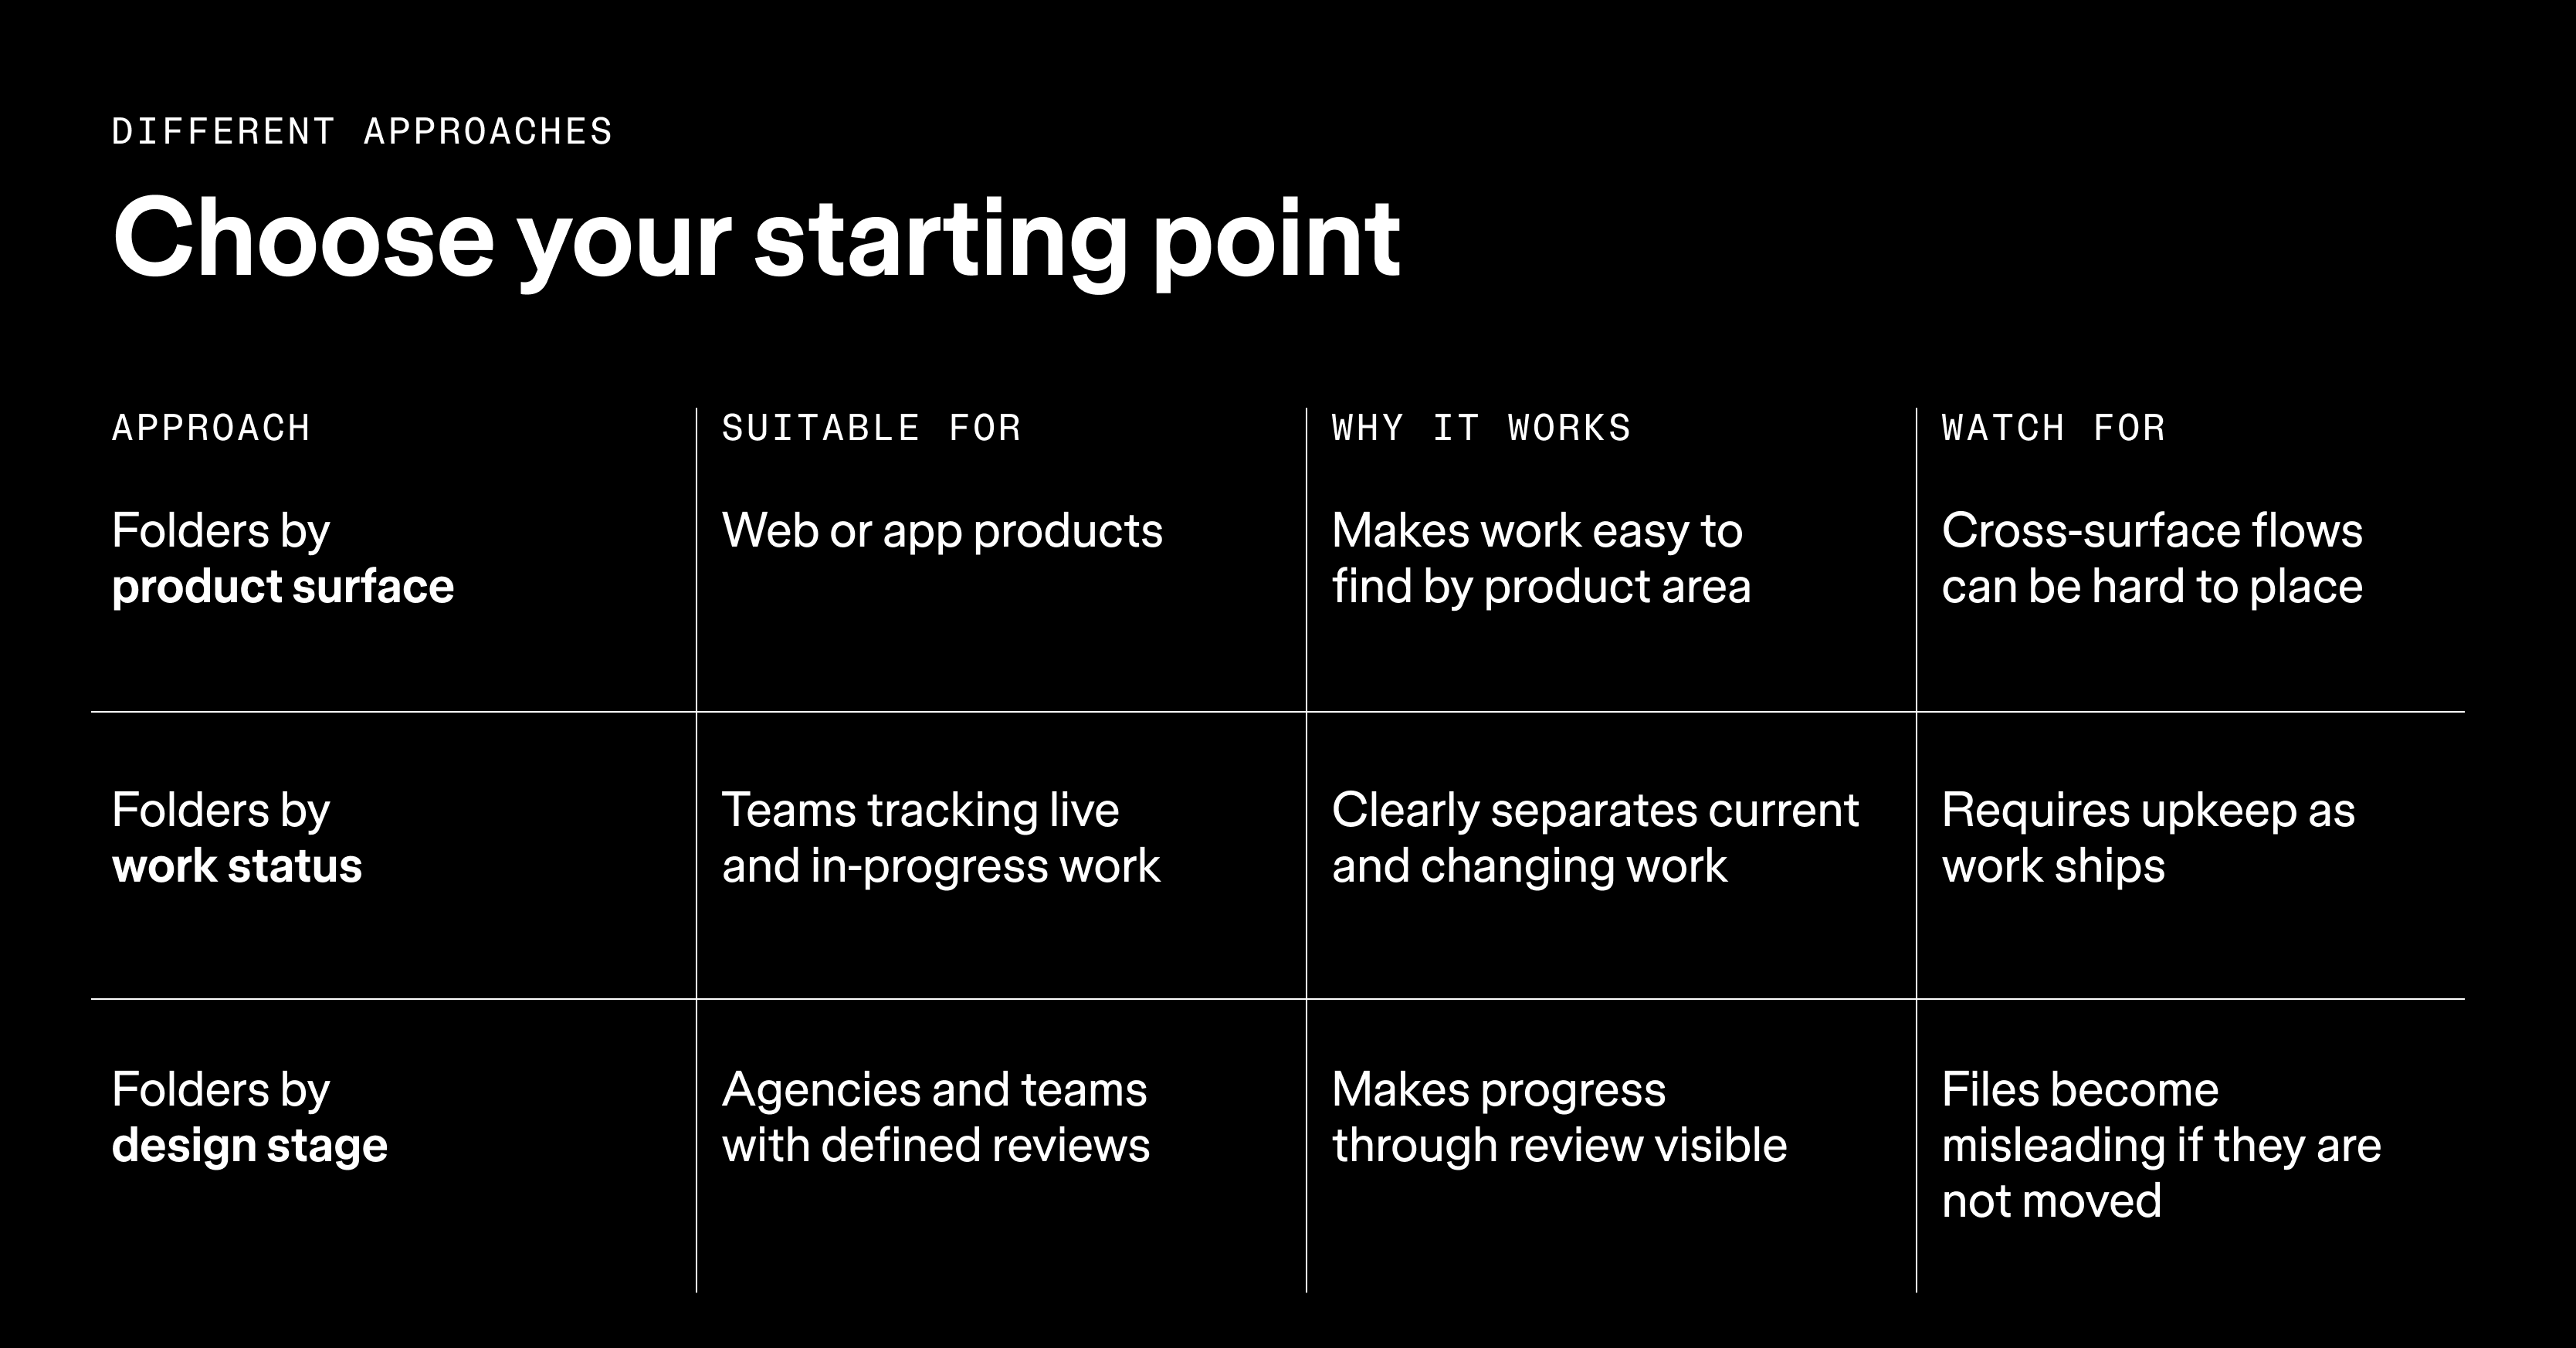
You can combine these patterns, but one should shape the first level of your folder structure. Start with the question people ask most often when they come looking for work. If teammates usually ask “where’s the checkout work?”, start with product surface. If stakeholders mostly ask “what’s currently being worked on?”, start with work status and organize product areas underneath it.
For many product teams, product surface is the simplest place to start. People often look for work by asking where in the product it belongs, while work status or design stage can sit neatly inside each surface.
Whichever structure you choose, keep the organizing logic consistent from one branch to the next. If Account contains Production and In progress, Cart should too. A hierarchy that changes its logic between branches is one nobody can predict.
By product surface
Best for web apps or products, and the easiest framework to build on.

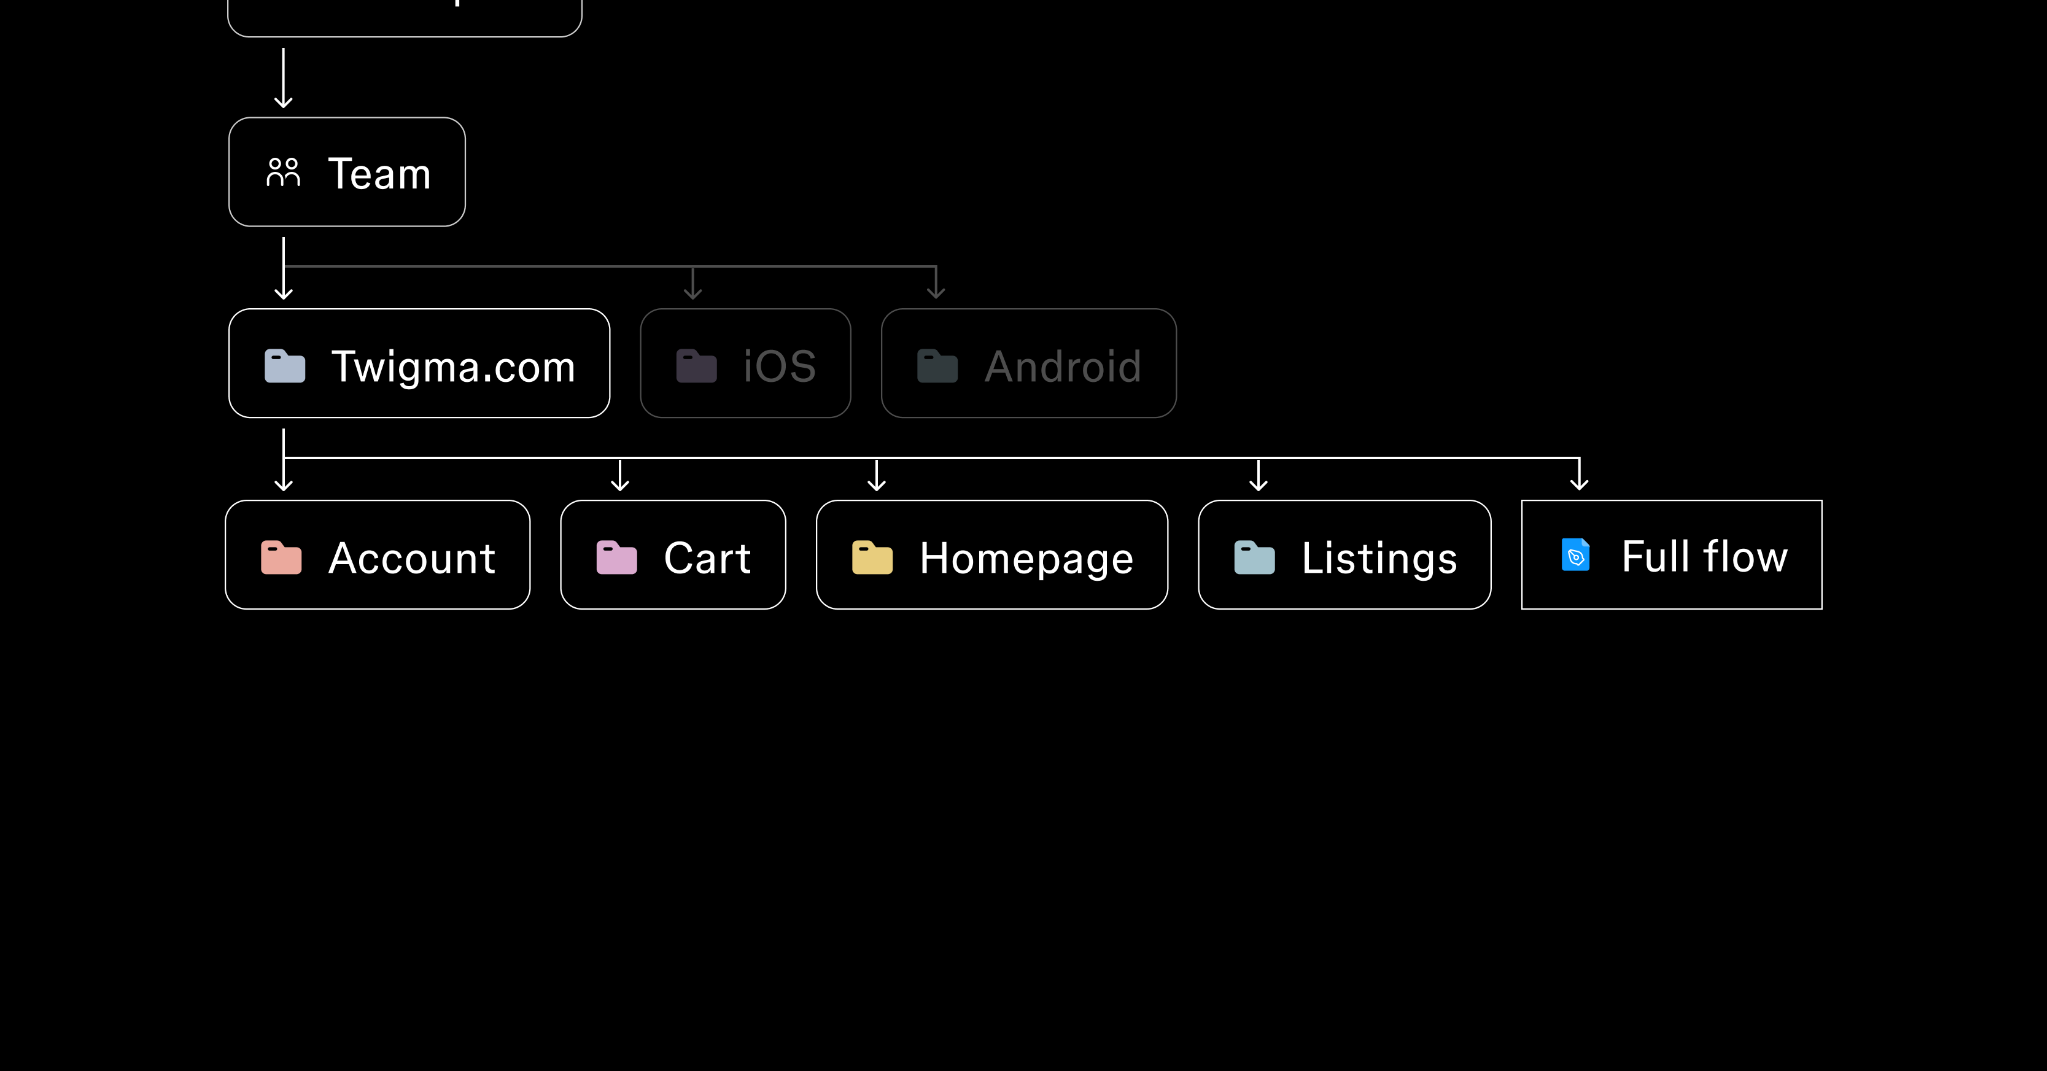
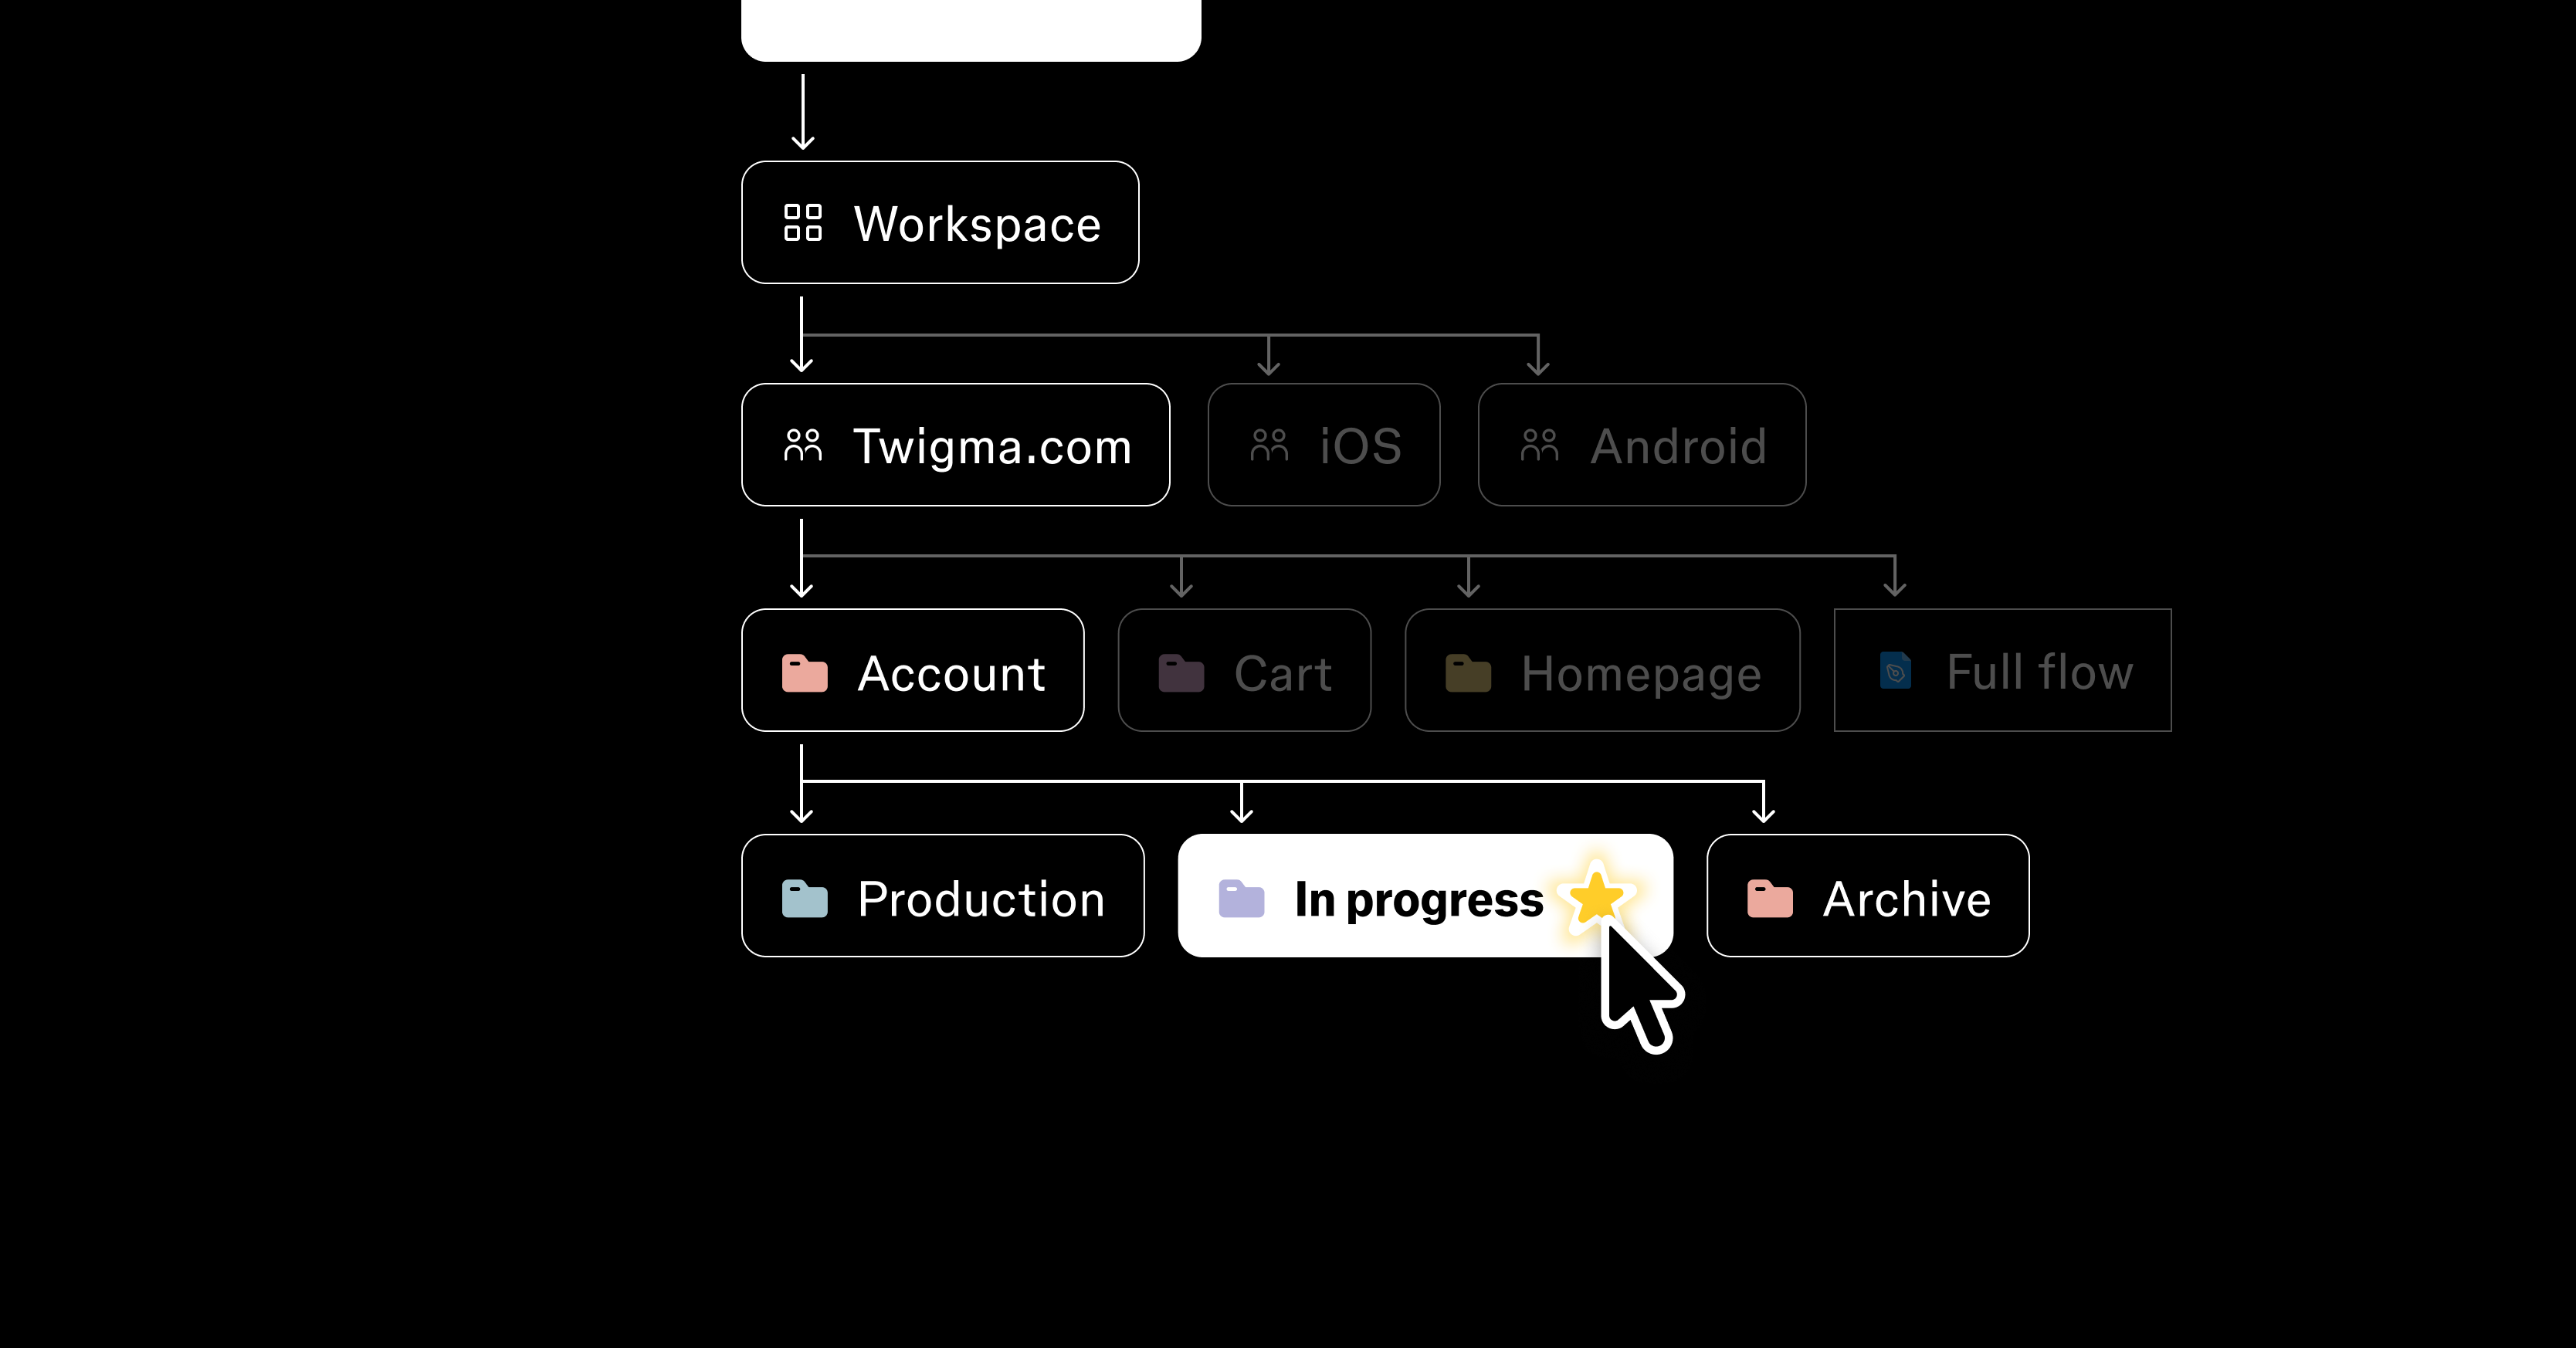
Twigma, a fictional e-commerce company, splits its team by platform first—Twigma.com, iOS, and Android—then by surface inside each one: Account, Cart, Homepage, and Listings, alongside a Full flow file. If you only ship one platform, drop the platform level and start with the surfaces.
Each surface can then hold its own logical flows as subfolders: Account containing Auth, Notifications, Settings, and User profile, each with the files for that flow.
Files scoped this way carry the right amount of context. Designers focus on the relevant problem without the distractions of a larger, more complex file, and cross-functional partners like copywriters and localization experts can work on individual releases rather than untangling entire user flows.
This is also a natural place to bring branching into your workflow; more on that in the files section.
By work status
Best for teams that need visibility into what’s live and what isn’t.

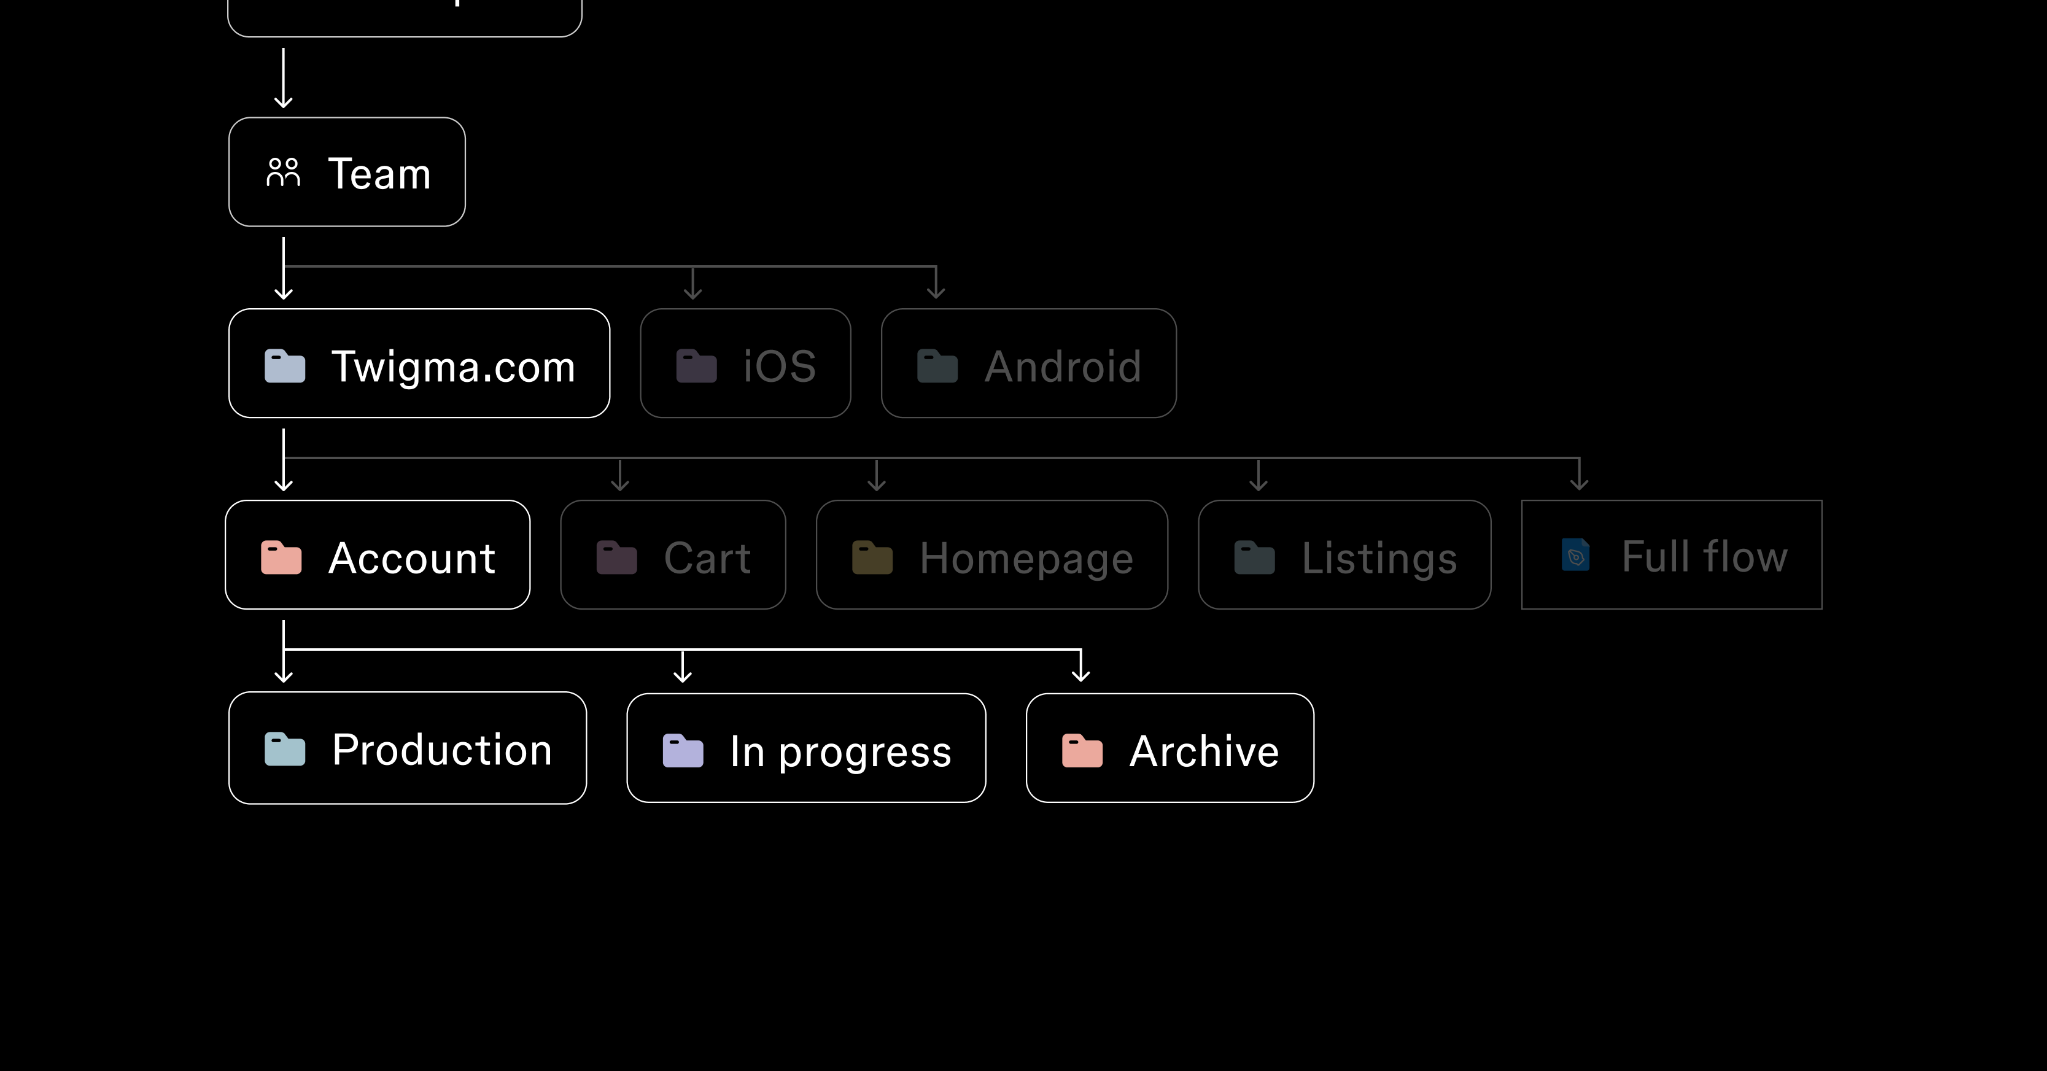
Work status can live inside each surface. An Account folder might contain a Production subfolder for approved, developed, live flows, an In progress subfolder where each design task gets a dedicated file, and an Archive subfolder for retired work.
Working this way, rather than inside one main user-flow file, keeps old screens from being confused with new ones and reduces file bloat. It also lets you name in-progress files after tickets from your project management tool, like “TWIG-813 - Button A/B test.” Update the Production folder as work ships.
One note on access: because subfolders inherit from their parent, everyone who can see Account can see its In progress folder too. That transparency is usually a feature. If your in-progress work needs a smaller audience, limit that subfolder to specific people.
You could also use branching instead of new files for ticket workflows, which removes the need for a separate in-progress space entirely.
By stage of the design process
Best for teams with defined stakeholder review sessions, like agencies.

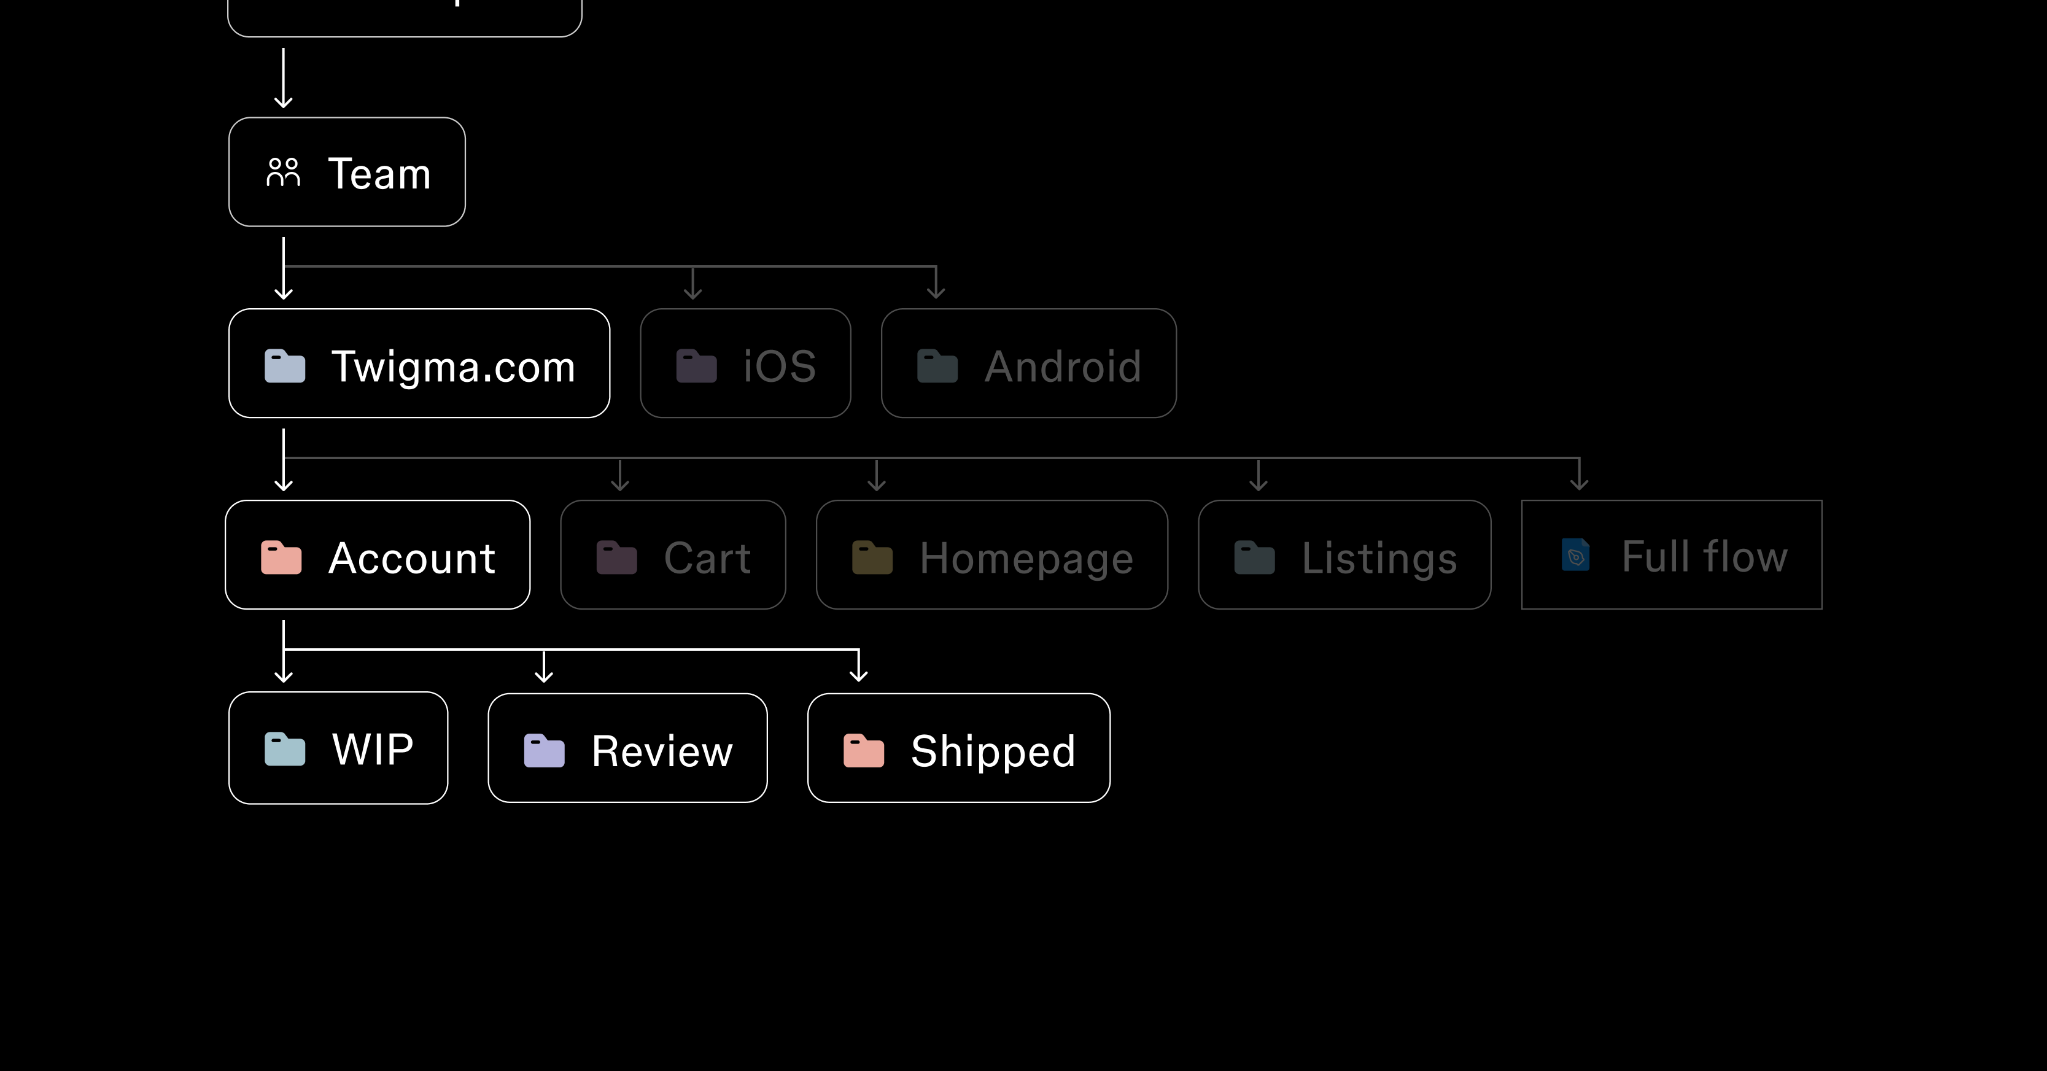
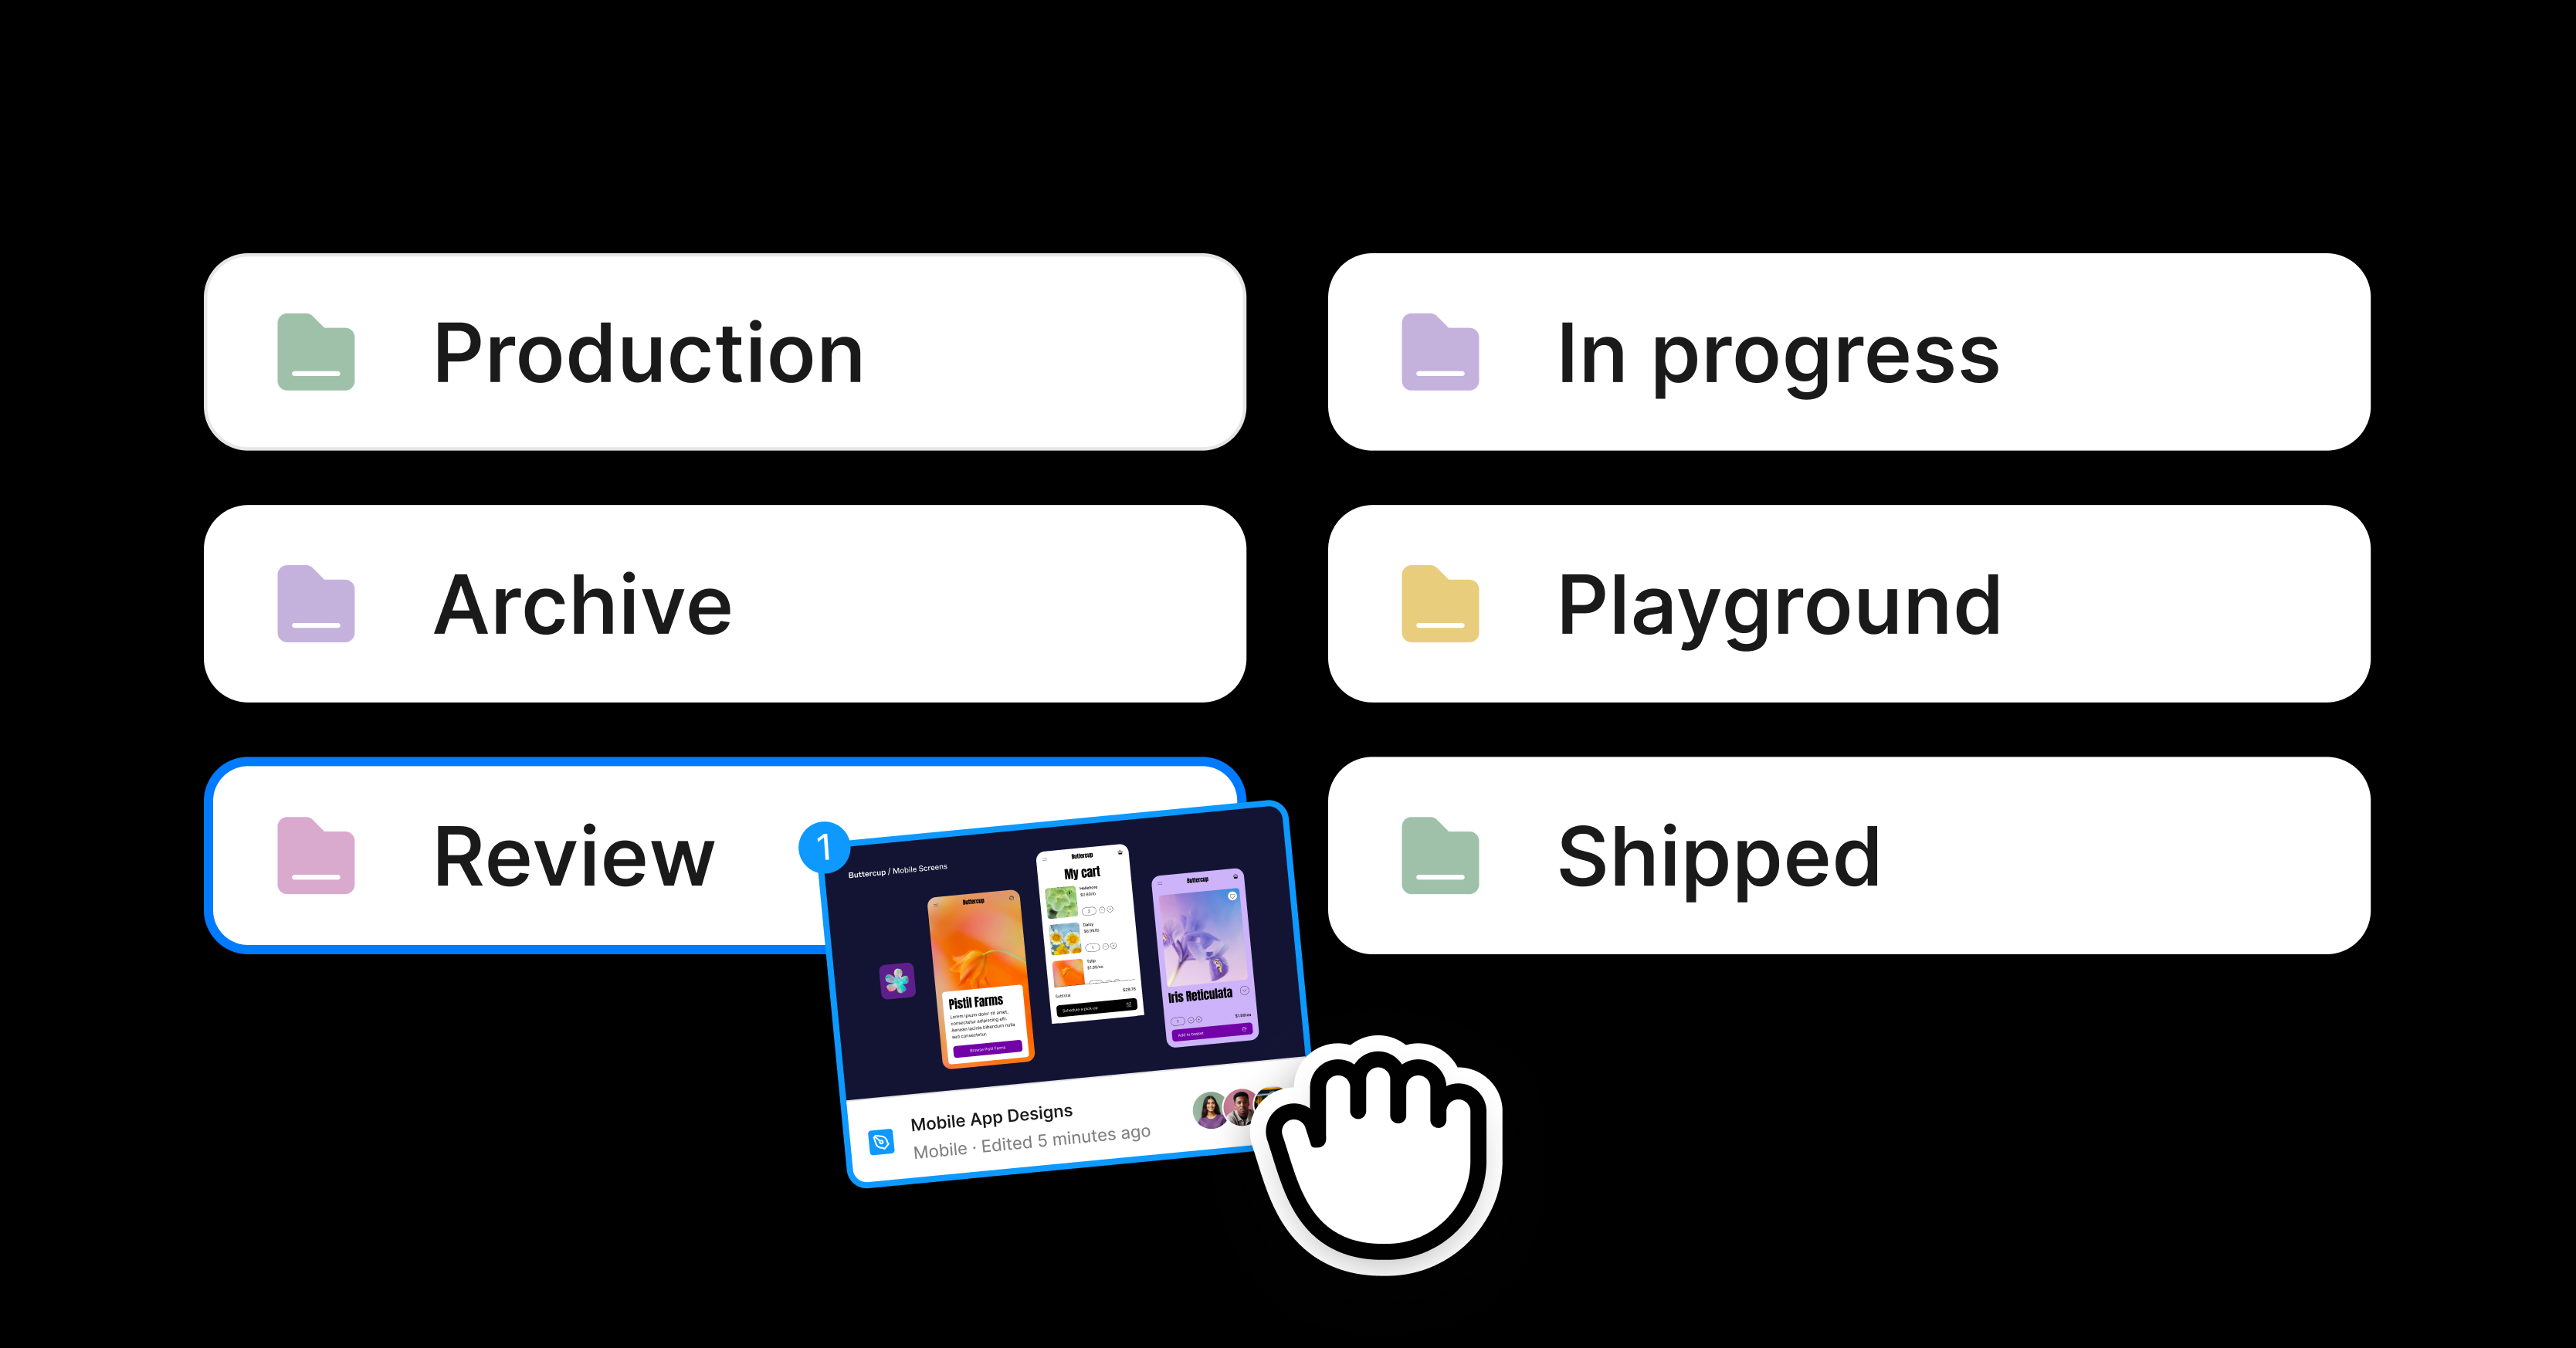
Create a folder for each stage your team aligns to. WIP, Review, and Shipped covers most processes; add stages for development, external stakeholder review, or copy passes if your process needs them. Files move between stage folders by drag and drop as work progresses.
Stages don’t have to be one global pipeline. An agency might lead with client folders and repeat the stage structure inside each one, so every client has its own WIP-to-Shipped flow, with access set once at the client folder and inherited by everything inside.
Folder-level sharing helps with stakeholder management here. If developers should only see work once it’s shipped, give them access to the Shipped folder and nothing above it.
Keep the hierarchy shallow
Folders can nest up to 10 levels deep. Treat that as a ceiling, not a target.

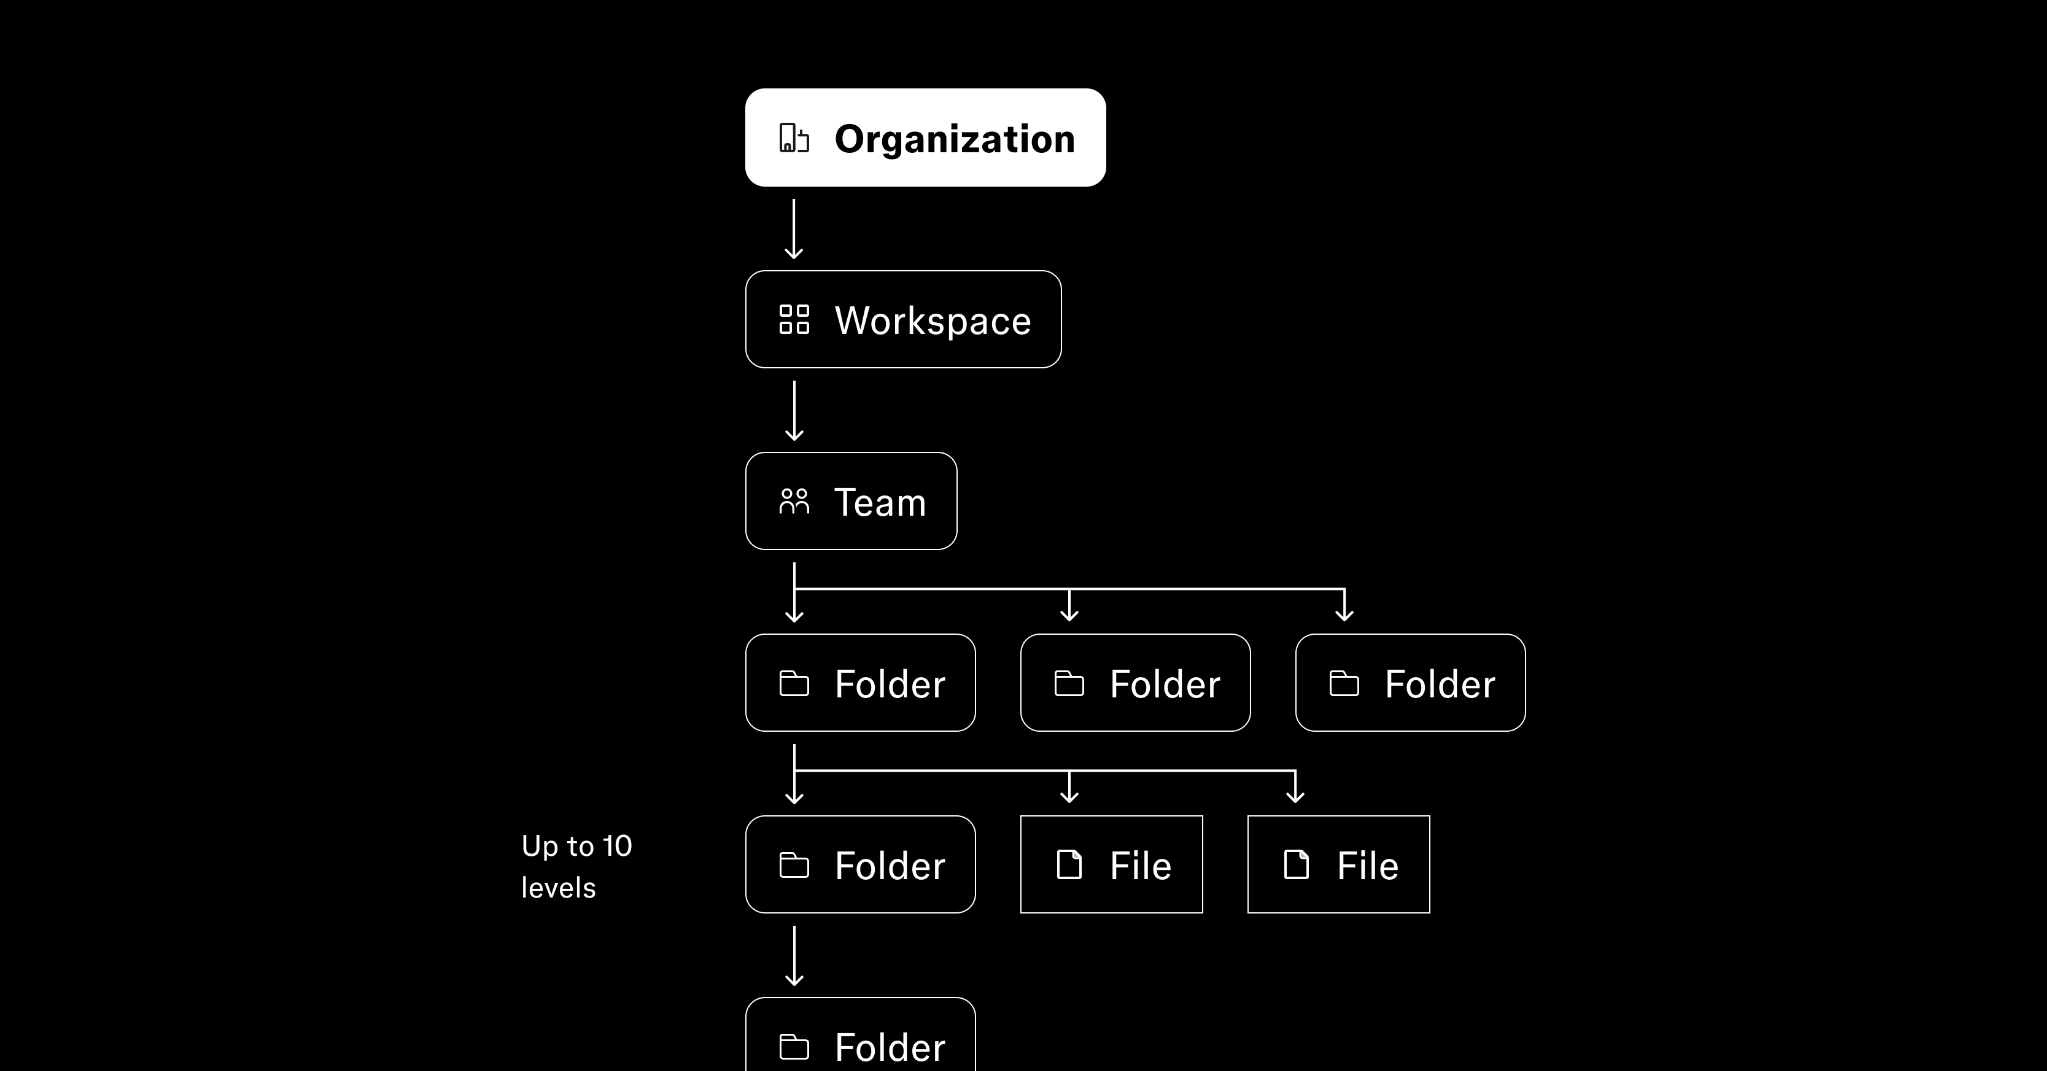
Nested folders make it easy to add structure, so the discipline is up to you. Start with the shallowest structure that works, and add a level only when it helps people predict where work belongs. If finding a file requires knowing the history of how your team evolved, the hierarchy is too deep.
A useful test: could a new designer guess where a file lives on their first try, without asking anyone?
And resist building scaffolding for work that doesn’t exist yet. Empty folders waiting for hypothetical future projects add noise now in exchange for a tidiness that rarely arrives. Create folders when the work does.
A reliable home for your user journey
Keep one reliable place for the full end-to-end user flow of your product, or at least the section you’re responsible for. This might be a dedicated file or a folder that brings several current flows together.
Someone will always need an up-to-date flow to demo the product, whether that’s your VP of Product, a developer, a sales manager, or your CEO. Keeping one current view lets the wider business understand the state of the product without asking a designer. Update it as you release, so demos and client prototypes always include the latest features.
For this workflow, align on a governance procedure for how work transitions from one place to another. Some teams schedule a regular quality day, where admins move signed-off work into the source-of-truth folders.
Archiving work
Move retired work out of active folders so nobody mistakes it for something current, and organize it the same way as the active work.
If you organize by product surface, give each surface its own Archive subfolder: retired Account work stays next to live Account work, where the context that makes it understandable survives. A single team-wide Archive is simpler and can be enough for smaller teams with little retired work, but at scale it tends to become a dumping ground, and work in a dumping ground loses the context that made it findable.
Whichever you choose, use it consistently. Bonus points for a trash emoji in the folder name.
An entire team called Archive is probably overkill.
Housekeeping

- Favoriting. Favorite important folders to keep them easy to reach, then remove them from your favorites when you no longer need them.
- Moving. Move folders from the context menu or by drag and drop. Because access is inherited, check who can access a folder after it lands in a new parent.

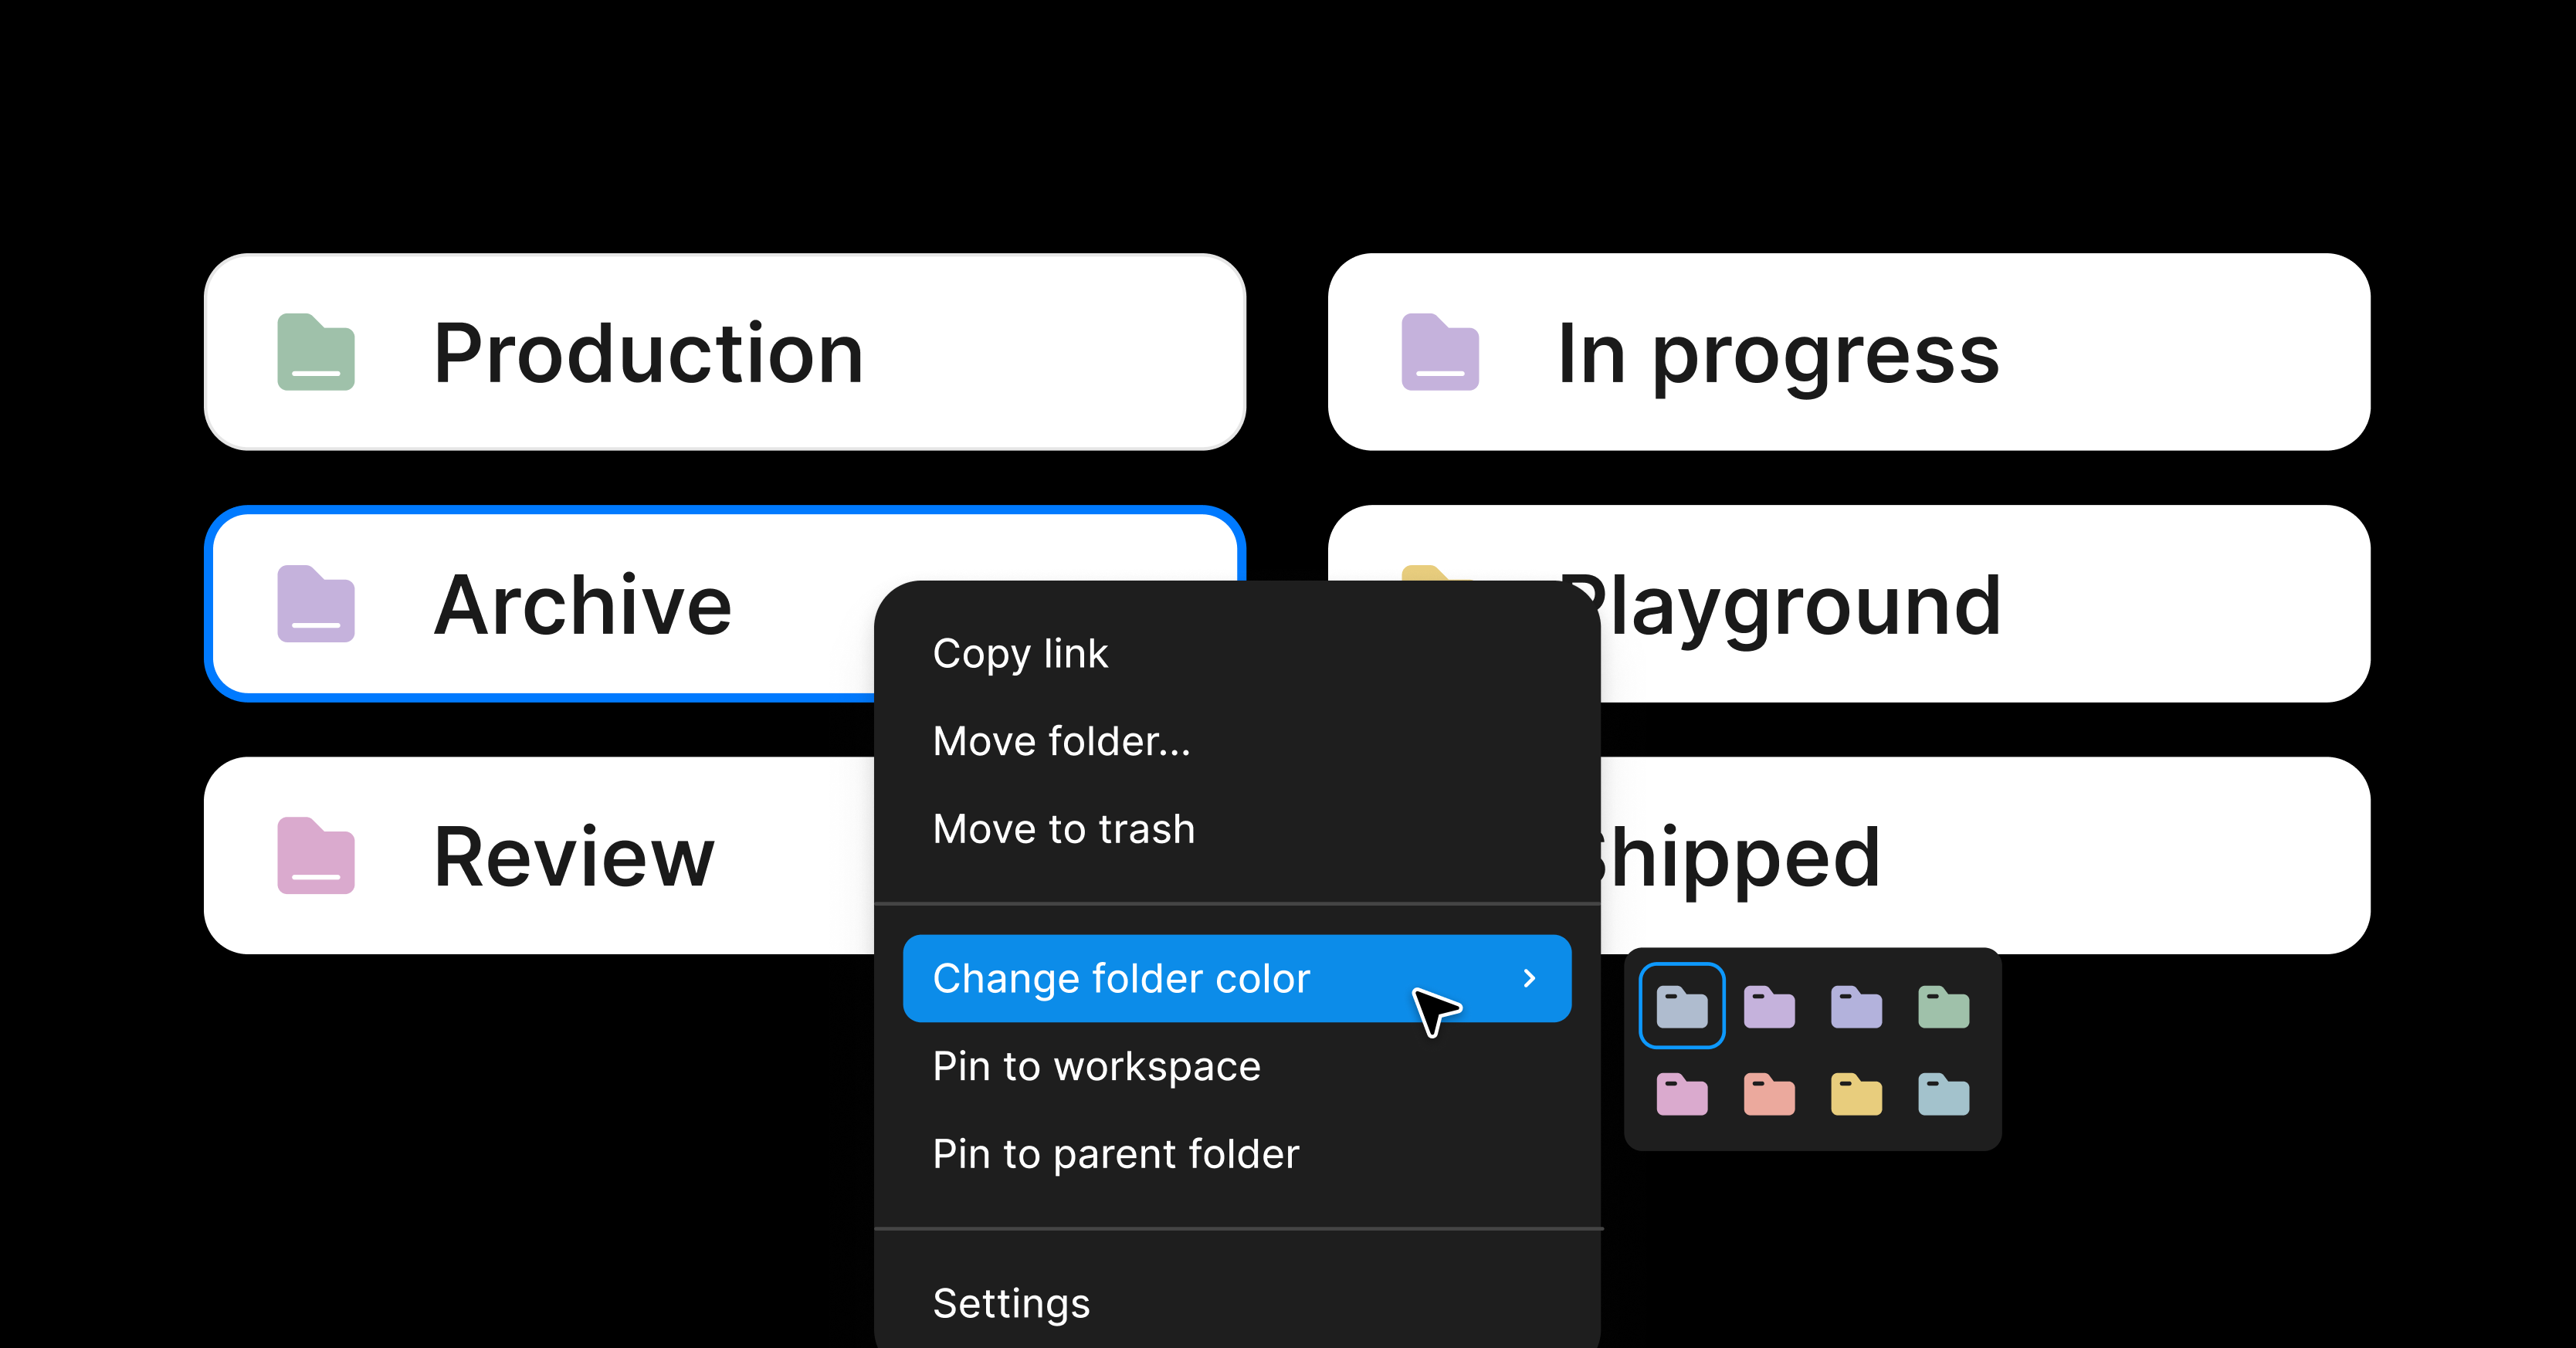
- Colors. One convention that works well is to use color for status, so all Production folders share one color and all In progress folders another. Any convention works if it’s consistent.
- Pinning. Pin a folder to its workspace or parent folder to keep the entry points to your structure obvious.
- Descriptions. Give folders descriptions so collaborators have context without opening anything.
Test it
Try one of these approaches and see how it lands. You may end up with a mixture of all of them, or something brand new. Folders are cheap to rearrange, so agree on the system as a team first, then adjust as you learn.
Best practices for managing files

Within teams there are folders, and within folders there are files. Files aren’t tied to a single folder forever; drag and drop them anywhere as your workflow demands.

Size
Many teams arrive in Figma with one file containing the entire design process, every iteration and version included. It’s tempting and often convenient, but try to keep files as small and nimble as possible.
Keep your main user flow in one file and iterative updates in others, or in branches, then merge newer work back into the main flow on a cadence that matches how your team releases. Move the smaller files into the relevant Archive folder once they’ve been merged. If you carry out image-heavy research, keep it in a separate file with the same name as the main file plus a “- Research” suffix. The performance gains are noticeable, and you’ll thank yourself months later.
Naming
Who remembers Account-Auth-v3.01-final2-copy-edits.png? It still gives me nightmares.
Descriptive names make work easier to find, and folders change what descriptive means. Folders can remove repeated prefixes from file names, but a name still needs to make sense outside its folder: in search results, shared links, browser tabs, and recent files, a file appears without its path.
- Too vague: Auth
- Useful: Account auth
- Too much: Shopping experience → Account → Authentication → In progress
Let the folder carry the broader structure, and keep enough context in the name for it to stand alone.
If you manage design work through project management software, name in-progress files and branches after tickets: “TWIG-812 - Form fields A/B test.” The name matches the task, and everyone can trace design to delivery.
Pro tip: type a hyphen followed by an arrow (->) in a file name and it turns into a proper arrow (→). It works backwards too.
Version history
Because Figma runs in the browser, versions are created automatically in every file’s history. Supercharge this with named versions to mark significant changes: “January - Full profile user flow.” Named versions make it easier to articulate the evolution of a design to stakeholders, and you can restore to earlier points as needed.
Branching
Branching keeps everyone working from the correct main file at all times, and it pairs naturally with the folder structures above.
Say you have a team for your consumer app, an Account folder, and a file for the Auth designs. A new feature comes in: add new form fields to the authentication flow. Create a branch named after the ticket, “TWIG-812 → Form fields,” and work there. Test ideas, gather feedback, build prototypes. Invite developers into the branch as viewers, or embed it in your project management tool.
Once the work is signed off and built, merge back into the main Auth file, add a named version with the date and a description, and move on to the next feature. With branching handling iteration and folders handling structure, there’s no reason left for a file called final-v2-copy.
Best practices for organizing work inside files
Most conventions inside a file do not depend on how folders are structured. If your current page, frame, and layer structure works, you don’t need to rebuild it.
Page structure
Optimize design files for speed, comprehension, and collaboration. A page skeleton that serves most teams:
- Cover: the thumbnail that makes your file discoverable in the browser
- Visual research: a home for inspiration screenshots
- User research: optional, for testing flows and concepts
- Discovery: where you flesh out ideas and store your rejected ones
- Flow: formalized ideas pulled into a structured user flow for feedback
- Prototype: optional, for micro-interactions and click-throughs. Prototypes need duplicated screens for animation, which confuses stakeholders if it’s mixed into the flow page
- Local components: optional, for components specific to this file
- Ready for development: signed-off work, kept separate so nobody ships the wrong asset
Add spacer pages (a series of hyphens as the page name) to visually separate phases, and emojis if that’s your team’s style. Your skeleton may be smaller or larger than this; every company is different.
Cover pages
Covers make files discoverable. At minimum, include the file name and a short description. Extend with a screenshot of the work inside, the status of the design, or the faces of the team working on it. Create the frame with the file cover preset, keep the structure consistent across files, and browse the Figma Community for inspiration.
Frame organization and platform flows
Good frame organization helps stakeholders and the developers who’ll build your ideas. Leave it to the end of the process, once the direction is agreed and you’re moving toward production. Any earlier and you’ll re-organize with every iteration.
If you ship for multiple platforms, organize frames on the canvas by flow, with one platform above the other and explicit on-canvas notes and consistent spacing. Consider sections to group the platforms. If you’re heading toward hundreds of frames per platform, split into separate pages or files. A good tiebreaker for where platform designs live: is the same developer building mobile and web? Same file if yes; split if no.
Layer naming
Our old enemy, the unnamed layer. How much you invest here depends on how much your layers need to communicate, especially to developers.
- No layer names. Legitimate during ideation, when a rectangle is allowed to be a button and you’re just having fun. Owner: the file creator.
- Refinement. As you prepare for sign-off, call a card a card, a number a number, a description a description. Names need to make sense to the rest of the team. Owner: file editors.
- Aligned to code. For handoff, name layers using BEM-style conventions or to match the HTML your developers will write. Do this once components reach the library in a production-ready state; any earlier and the constant small changes cause more problems than they solve. Owner: the design systems team, in collaboration with engineering. If your team isn’t closely aligned with engineering, skip this. The naming only works if both sides use it.
- Merging the concepts. Use Refinement names in the layers panel, then document code-aligned naming, usage notes, and status in the component description field, which surfaces for designers in the properties panel and for developers in the inspect panel. Keep longer documentation in a separate file so docs and components version independently.
File organization can feel like a chore at first. But when collaboration is at the heart of your design process, the way you structure and name work is part of how you communicate with everyone who touches it. Agree on a system your team can keep up, and let it grow with the work.